Lab 5: Svelte III (Loading Data & Scrollytelling)
In this lab, we will learn:
- How to load data from an API and display it in a Svelte app
- How to import external Svelte components
- How to tell a narrative via Scrollytelling
Table of contents
- Lab 5: Svelte III (Loading Data & Scrollytelling)
- Check-off
- Lab 5 Rubric
- Slides
- Step 1: Loading data from an API
- Step 1.1: Follow some of your classmates!
- Step 1.2: Viewing the data in our browser
- Step 1.3: Triggering a function call on site load with the
onMountlifecycle function. - Step 1.4:
trying tofetchGithub stats andawaiting a response - Step 1.5 Turning
retrieveGithubDatainto an arrow function - Step 1.6 Displaying the data with
{#if} - Step 1.7: Displaying the data in a more useful way
- Step 2: Scrollytelling your Project Milestones
- Step 2.1: Update your project data
- Step 2.2: Creating a
ProjectNarrativeSvelte Component - Step 2.3: The Martini Base: An eyecatching introduction to array manipulations
- Step 2.4: Install
Scrolly - Step 2.5: The Martini Stem: Creating a Narrative
- Step 2.6: Sorting Projects by Year
- Step 2.7 Reactive Project Index
- Step 2.8 Displaying one Project at a time
- Step 2.9: Making it pretty with CSS!
- Cheat Sheet
Check-off
Asynchronous lab checkoff is no longer one-and-done. To receive a lab checkoff, please submit your work asynchronously by filling out this form. TAs will review your lab and post your grade. If you do not pass, you will be able to fix any issues and resubmit or receive help in an office hour until the deadline.
Lab 5 Rubric
To successfully complete this lab check-off, ensure your work meets all of the following requirements:
- GitHub stats are displayed on the home page with styling
- At least 9 projects total are visible on the project page.
- Projects have (different!) years on them, and include some non-placeholder story entries
- The title of the project page includes an additional calculation besides the number of projects
- Scrollytelling on the projects page lists projects in chronological order, with one project sticking to the top at a time
- Scrollytelling includes some additional CSS styling
Slides
Step 1: Loading data from an API
So far we have been loading data from a static JSON file in our own repository. But what fun is that?
Let’s load data from another website and display it in our app! We will use GitHub’s API to read stats about our GitHub profile and display them in our homepage.
An Application Programming Interface (API) is a set of rules that one software application defines for others to interact with their data. So, we can ask specific questions about Github’s data (like “how many followers does this user have?”) or take specific actions (“follow this user”) from inside of code, rather than needing to use the Github website!
Step 1.1: Follow some of your classmates!
If you’re new to GitHub, you may not have followers yet. Since we will be printing out your number of followers from the GitHub API in this step, it will be more rewarding the more followers you have. Plus, you get to explore how quickly the API updates with new data!
If you’re in the lab room, ask the people next to you, behind you, and in front of you for their GitHub usernames, and follow them. Then ask them to follow you back.
Also, send your Github username to the class Slack channel so others know who to follow, and follow some of your classmates using their usernames!
Before submitting this lab, you should all have at least three followers and three following.
Step 1.2: Viewing the data in our browser
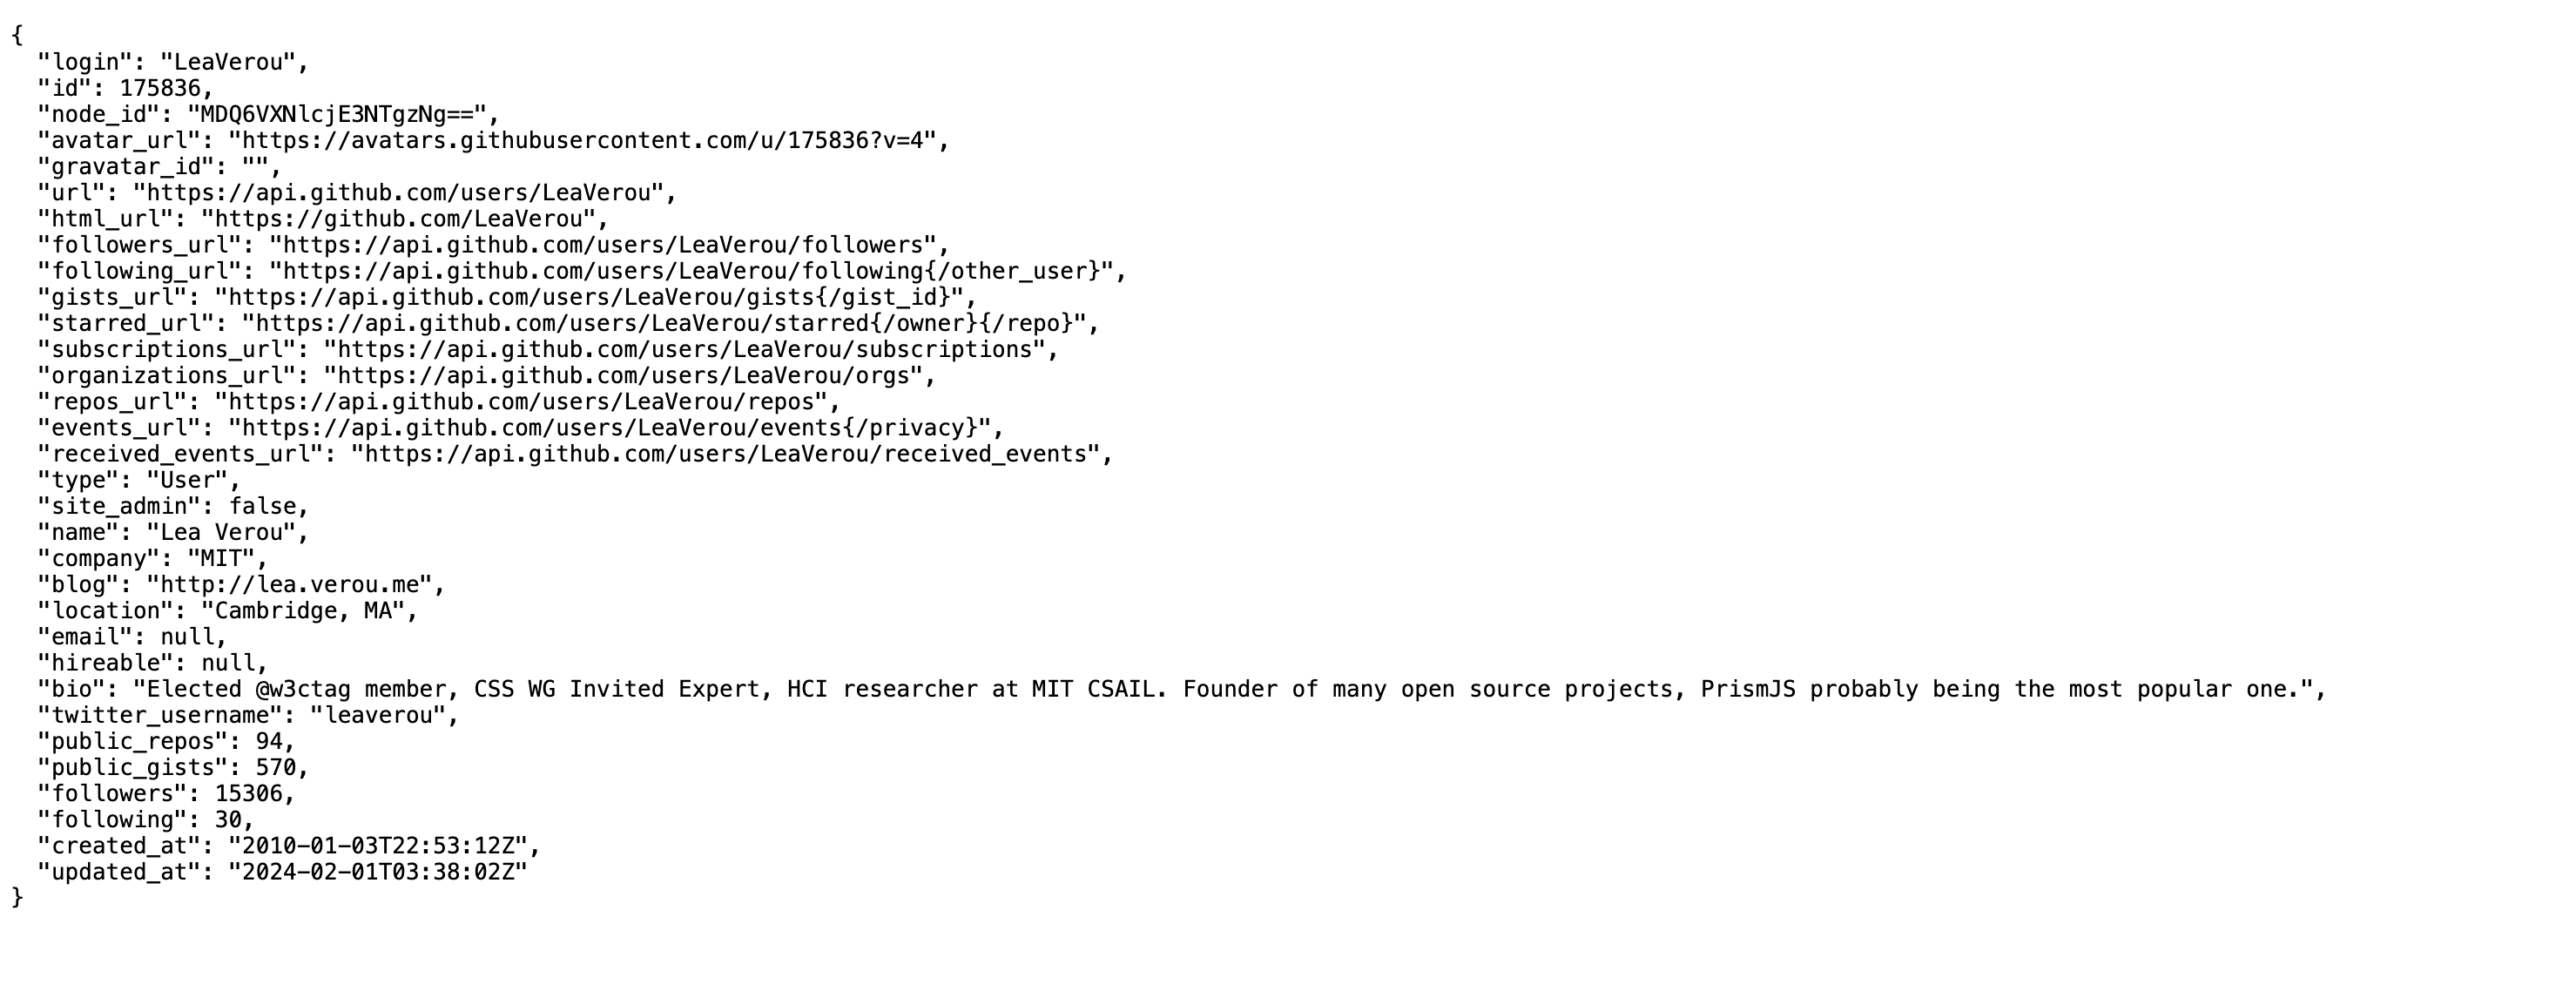
GitHub is one of the few APIs left that provides public data without requiring us to authenticate. We can use the /users/username API endpoint to get public data about a user. Visit https://api.github.com/users/your-username in your browser, replacing your-username with your GitHub username. For example, here is mine: https://api.github.com/users/leaverou.
You should see something like this in your browser:
Step 1.3: Triggering a function call on site load with the onMount lifecycle function.
To display our Github stats, we’ll want to prepare some variables to hold the data, populate them once when our page first loads, and then use the variables to display our stats on our page. This is the perfect job for Svelte’s onMount lifecycle hook. Every Svelte component has a lifecycle, which includes creation, update, and destruction. A lifecycle hook runs at a certain checkpoint in a component’s lifecycle. The onMount hook runs when a component gets created and gets “mounted” onto the DOM.
First, let’s go to src/routes/+page.svelte, and prepare a few variables for our Github data in our <script>
import { onMount } from "svelte";

let githubData = null; // This will eventually hold our Github stats
let loading = true; // This will be true *until* the fetch's promise resolves to a value
let error = null; // If the API call resulted in an error, it will go into this variable
Add these lines of code to your <script> block, below the variables you just defined, to trigger the onMount hook:
function retrieveGithubData(){
  console.log("Page has been mounted!")
}
onMount(retrieveGithubData);
onMount is a function that takes another function as an argument. You defined the function retrieveGithubData and passed it as the argument for onMount. When functions are passed as arguments to other functions, they are called callback functions, because the outer function often calls the argument function when it’s done doing its own thing. Here, retrieveGithubData is your callback function.
Now check the console in your developers’ tools on your website – you should see a log in the console with your print statement! You should get a new print statement everytime you click to a different page on your site and then click back to your home page.
Step 1.4: trying to fetch Github stats and awaiting a response
To make an arbitrary HTTP request in JS, we can use the fetch() function. For example,
let data = fetch("https://api.github.com/users/your-username");
fetch()is an example of an asynchronous function. This means that it does not return the data directly, but rather a Promise that will eventually resolve to the data after successful retrieval. In fact,fetch()returns aPromisethat resolves to aResponseobject, which is a representation of the response to the request. To get meaningful data from aResponseobject, we need to call one of its methods, such asjson(), which returns aPromisethat resolves to the JSON representation of the response body.You do not need to understand promises deeply for the purposes of this lab, but if you want to learn more, you can read MDN’s guide to promises, or 6.102’s lecture notes on Promises.
Change your retrieveGithubData as follows (replace YOUR_USERNAME to match the URL you have been previously using):
async function retrieveGithubData(){
  console.log("Page has been mounted!")
  let response = await fetch("https://api.github.com/users/YOUR_USERNAME");
  console.log(response);
  githubData = await response.json();
  console.log(githubData);
}
What do await and async mean here? As described before, fetch() returns a Promise, which takes time to resolve into the actual value you want. When you add await to fetch() you ask Javascript to pause execution until the Promise resolves to a proper value, and only then assign the resolved value to the variable. In our case, this means that we can trust that response will hold the actual resolved Response object, and githubData will hold the actual resolved JSON object when we need them later, rather than sometimes still being Promises. When any code inside a function contains awaits or is otherwise asyncronous, it must be marked as async, or Javascript will throw an error.
In your console, you should now see what a Reponse object looks like, and what its JSON looks like.
One last thing. Now our website relies on the Github API always being online. What happens if Github has an outage? (It happens more often than you’d think) We don’t want our site to break when Github breaks. Exception handling to the rescue! We’re going to use Javascript’s try...catch statement to gracefully catch errors when they happen.
Wrap the contents of your retrieveGithubData function with a try...catch block:
async function retrieveGithubData(){
  try { // First, try running this block of code
    // add your previous retrieveGithubData code here
  } catch (err) { // if the "try" block runs into an error, cancel excecution and run this code instead
    error = err;
  }
  loading = false; // don't forget to add this line!
}
You won’t notice any difference in functionality yet, but it’s good practice to always think about how to gracefully handle unexpected errors.
Step 1.5 Turning retrieveGithubData into an arrow function
You might wonder what you would have to do if you wanted to run multiple functions in onMount, because onMount only accepts one function as an argument. Put all the code in retrieveGithubData? Rename the function?
Javascript has a solution for this! You can define a function without ever giving it a name by defining an arrow function.
You can define an arrow function with two arguments as
(arg1, arg2) => {
  statement_1;
  statement_2;
  ...
}
Try turning your retrieveGithubData function into an arrow function! your onMount function call should look something like
onMount(async () => {
  // code from your old retrieveGithubData function
})
How many arguments does your arrow function have?
Step 1.6 Displaying the data with {#if}
Now that we have set up our loading variable to flip to false only after our data has finished fetching, we can safely display githubData without worrying about it being null. Time to learn a new Svelte control flow block: the {#if} block.
In the HTML section of src/routes/+page.svelte, Add this above your projects list:
{#if loading}
    <p>Loading...</p>
{:else if error}
    <p>Something went wrong: {error.message}</p>
{:else}
    The data is {JSON.stringify(githubData)}
{/if}
It should look something like this:

Step 1.7: Displaying the data in a more useful way
Now that we’ve made sure we can fetch the data, let’s display it in a more meaningful way. Replace The data is {JSON.stringify(githubData)} with a <section> with an <h2> for that part of your page.
Decide which stats you want to display, e.g. number of public repos (public_repos key), number of followers (followers key), etc. and wrap them in a <dl> list. Feel free to include any attributes (stats) of your choice that you can see in the API response. Here’s an example of what that code may look like:
{#if loading}
    <p>Loading...</p>
{:else if error}
    <p>Something went wrong: {error.message}</p>
{:else}
    <section>
        <h2>My GitHub Stats</h2>
        <dl>
            <dt>Followers</dt>
            <dd>{githubData.followers}</dd>
            <dt>Following</dt>
            <dd>{githubData.following}</dd>
            <dt>Public Repositories</dt>
            <dd>{githubData.public_repos}</dd>
        </dl>
    </section>
{/if}
It should look like this before any styling is applied:

Add some of your personal styling as you see fit!
Because Svelte’s local server will re-run the
fetch()call every time you save, it’s easy to hit the rate limit as you iterate on CSS. To avoid that, you can replace thefetch()call and use this instead while you’re experimenting with CSS:let response = await { ok: true, json: async () => ({ followers: 100, following: 100, public_repos: 100, public_gists: 100, }), };
This is what I did:

In case you want a similar style, the gist of it is:
- I applied a grid on the
<dl>with four equal-sized columns (1freach) - I used
grid-rowto override the automatic grid placement and specify that every<dt>should be placed on the first row of the grid, and every<dd>on the second row
Step 2: Scrollytelling your Project Milestones
So far, we have built our skills in HTML, CSS, Javascript, and Svelte. Now let’s flex our narrative visualization muscles and tell the story of how each of our projects has taught us new skills and helped us grow as individuals.
Wouldn’t it be cool if we could actually tell that story in our own words, and have the viewer progress through project visualizations as they progress through the narrative?
You may recall from lecture the concept of a martini glass narrative structure:

As your reader passes through your narrative, they first encounter the base – the attention-grabbing introduction. Then they pass through the stem, an explanatory, author-driven narrative. Finally, they encounter the bowl, and are exposed to a looser, reader-driven visualization to allow for independent exploration.
Let’s do that!
Step 2.1: Update your project data
First, update your project data (src/lib/projects.json) with your assignments from the class and any other projects you can think of. Be sure you do each item on this list:
- Have at least 9 projects, even if you need to leave some placeholder data in. But some projects should have actual content in them, even if you make it up.
- Make sure each project has an image (that shows up on your deployed github page, and not just locally!)
- Add a
"year"field to each project with a number for the year you worked on it. - Add a
"story"field to each project. This will be what scrolls past on the left side of the screen. You can write whatever you want, you can even have an LLM generate a few sentences for each project as long as you check that the result is coherent, relevant, and tells a story that complements the project next to it. But before you submit your lab, this should not all be placeholder text.
Don’t freak out if you don’t know what to write! Your scrollytelling narrative doesn’t have to include your actual projects (though it absolutely can if you want it to) You can make everything up! You can even ask an LLM to generate the project content and narrative, like I did when writing this lab. Have some fun with it!
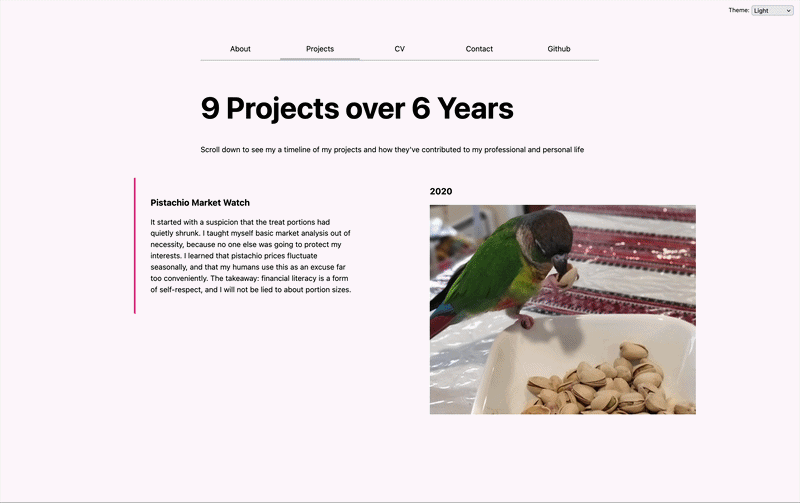
Here is an example project entry:
{
  "title": "Pistachio Market Watch",
  "year": 2020,
  "image": "images/pistachios.png",
  "description": "Tracking pistachio prices so I know when I'm being shortchanged.",
  "story": "It started with a suspicion that the treat portions had quietly shrunk. I taught myself basic market analysis out of necessity, because no one else was going to protect my interests. I learned that pistachio prices fluctuate seasonally, and that my humans use this as an excuse far too conveniently. The takeaway: financial literacy is a form of self-respect, and I will not be lied to about portion sizes."
},
Make sure not all your projects have the same year, since in the next lab we’ll be drawing visualizations based on it, and it would be a pretty boring visualization if they all had the same one!
Step 2.2: Creating a ProjectNarrative Svelte Component
Create a new file in src/lib and name it ProjectNarrative.svelte. This will contain our Scrolly, any javascript we need to set up, and our component’s CSS.
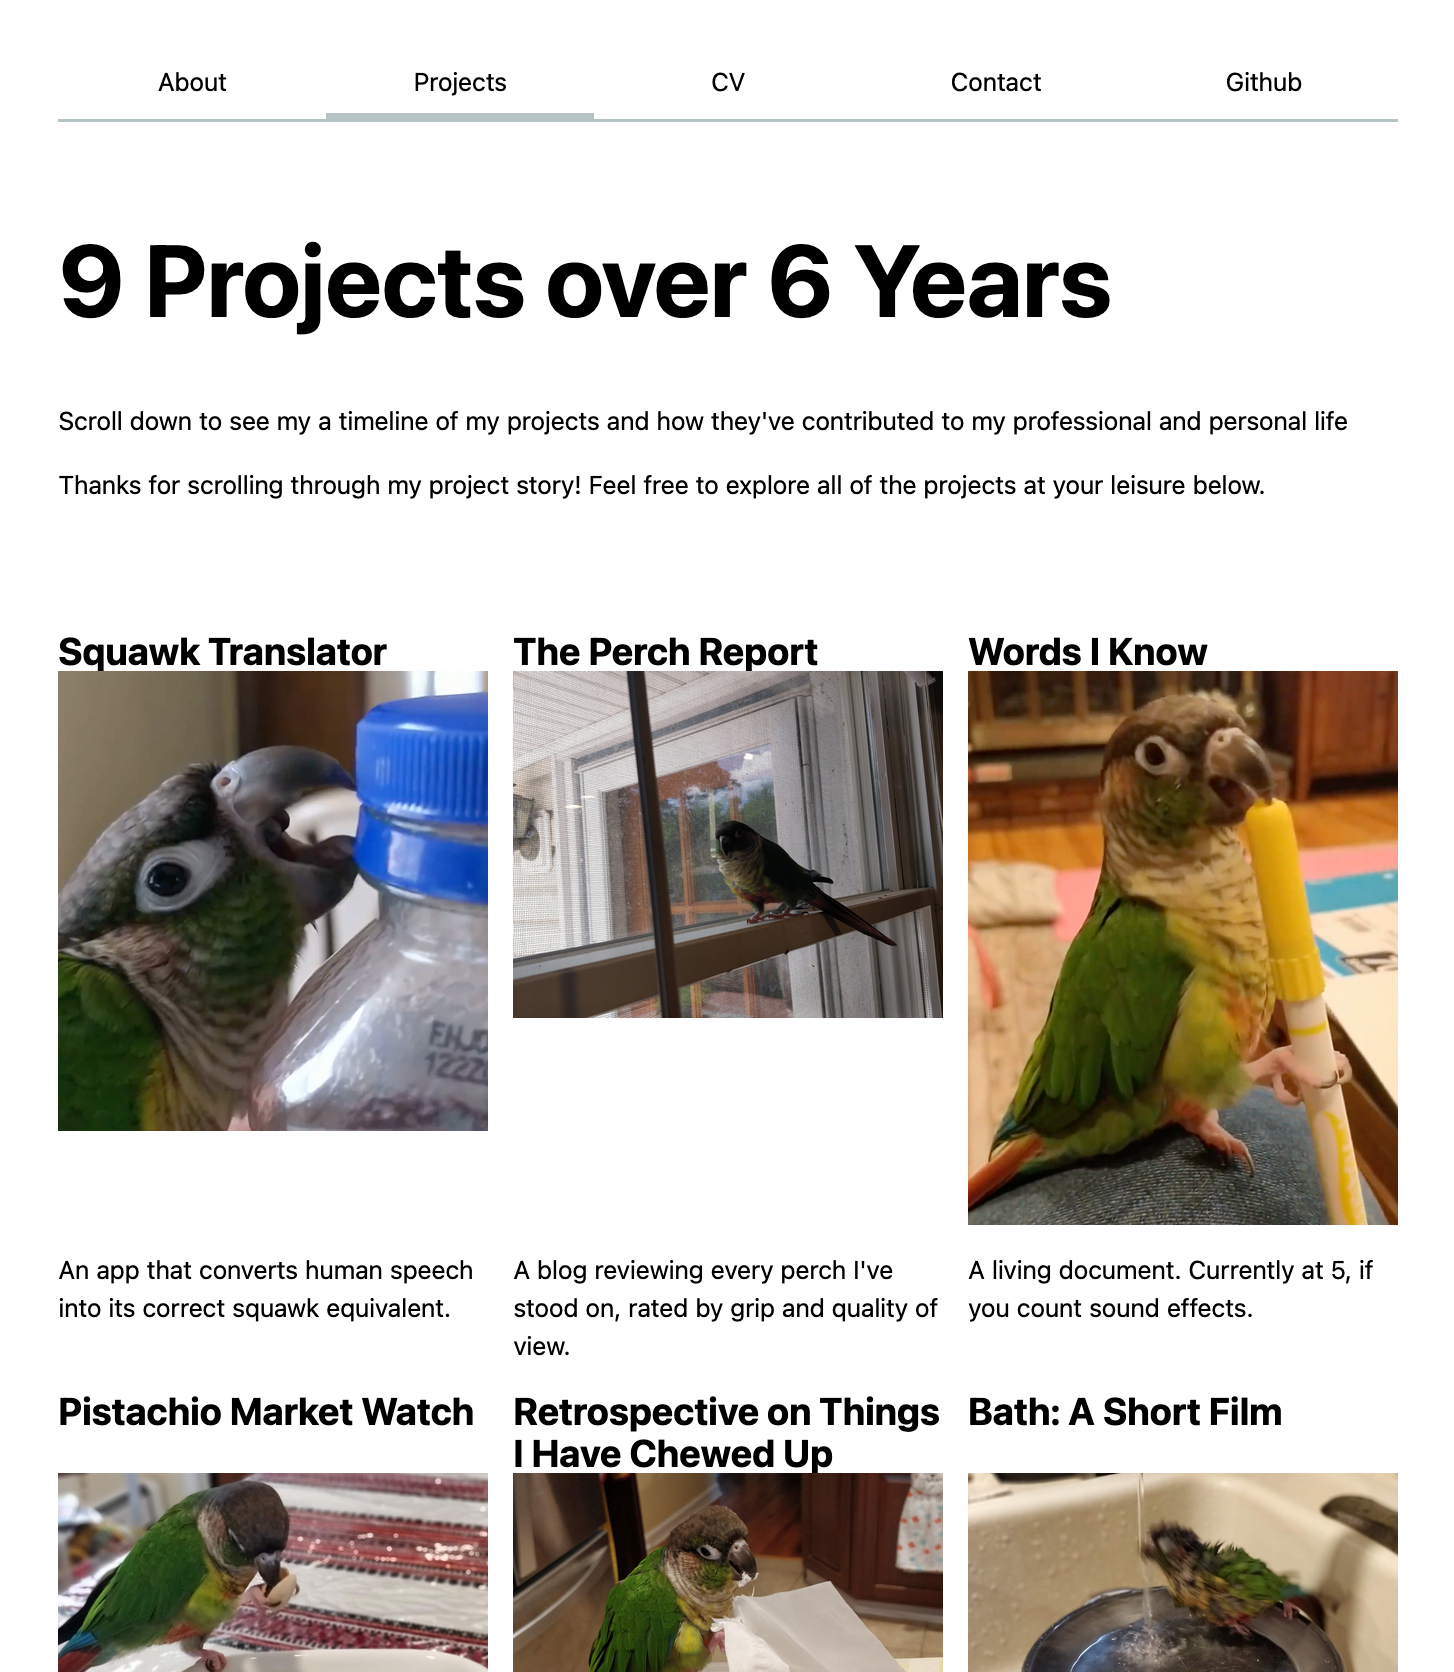
In src/routes/projects/+page.svelte, import your ProjectNarrative like you have imported other components, and add it under your <h1> along with some intro and outro text.
<p>Scroll down to see my a timeline of my projects and how they've contributed to my professional and personal life</p>

<ProjectNarrative />

<p class="outro">Thanks for scrolling through my project story! Feel free to explore all of the projects at your leisure below.</p>
You may want to add a CSS rule for .outro to add a margin-bottom and prevent your outro text from being too close to your project grid.
Step 2.3: The Martini Base: An eyecatching introduction to array manipulations
To wow our readers with the number of projects we’ve completed over the years, let’s count the range of years that our projects cover and write that in our <h1> on the projects page.
In the <script> of your projects +page.svelte, read through your array of projects and pull out an array of just the project years:
let years = projects.map(proj => proj.year)
This is our first encounter with the map() method for arrays. It creates a new array from calling a function for every array element. This is also our second encounter with an arrow function. Recall that an arrow function is just a regular function without a name. Here, we define a function that takes argument proj, and returns the year attribute on proj. The map() method applies the function to every element in projects and returns a new array, which we call years.
Now let’s find the maximum and minimum years, and subtract them to get our full range:
let range = Math.max(...years) - Math.min(...years);
What are those ellipses doing there? They represent the spread operator. It turns out that Math.max and Math.min will take the max and min of multiple numbers as long as each number is its own argument to the functions. What we have is one array years, so we will need to spread the numbers in the years array into a collection of arguments for the max and min functions.
Now you can replace the <h1> on your Projects page with something like this (though feel free to experiment, as long as its eyecatching!)
<h1>{projects.length} Projects over {range} Years</h1>
At this point, your projects page should look like this:
Step 2.4: Install Scrolly
We prepared a <Scrolly> component for you to use in this step, you will find the documentation here: svelte-scrolly. If you find any bugs, please file bug reports directly at its bug tracker.
There is an official Svelte package for this purpose: @sveltejs/svelte-scroller but it seems to only cater to scrollytelling cases where the narrative is overlaid on top of the visualization, which is not what we want here.
To use <Scrolly>, you first need to install it. In your terminal, make sure you’re inside your project folder and run: npm install svelte-scrolly. Then import it in the <script> of your ProjectNarrative.svelte component:
import Scrolly from "svelte-scrolly";
let scrollyProgress = 0
npm is short for node package manager. It’s like pip for python packages. Basic Javascript (or Svelte, in this case), doesn’t always have the functionality you need, so there is a whole public registry of packages that people have contributed over the years, and we can use npm to install any of them into our own projects to use them!
Then you can use it like this:
<Scrolly bind:progress={ scrollyProgress }>
	<!-- Story here -->
	<svelte:fragment slot="viz">
		<!-- Visualizations here (these will stay sticky) -->
	</svelte:fragment>
</Scrolly>
<svelte:fragment> is a special element that we can use when no suitable element exists, to avoid bloating our DOM with pointless wrapper elements. If there is an actual element that makes sense to use, you should use that instead!
Step 2.5: The Martini Stem: Creating a Narrative
Remember: Before you finish the lab, you should have something meaningful for the narrative.
In this section, we will be displaying the narrative that will be scrolling past on the left side of the screen. Import your projects array from projects.json, and use an {#each} block to iterate through your projects. I suggest the following:
- A wrapper
<section> - Within that, a
<div> - Within the div, an
<h3>with the project title and a<p>with the project story
Let’s also visualize what this progress variable is doing on the “viz” side of the Scrolly. Add a {scrollyProgress} inside the <svelte:fragment> of your Scrolly.
If done right, your page should look like this:
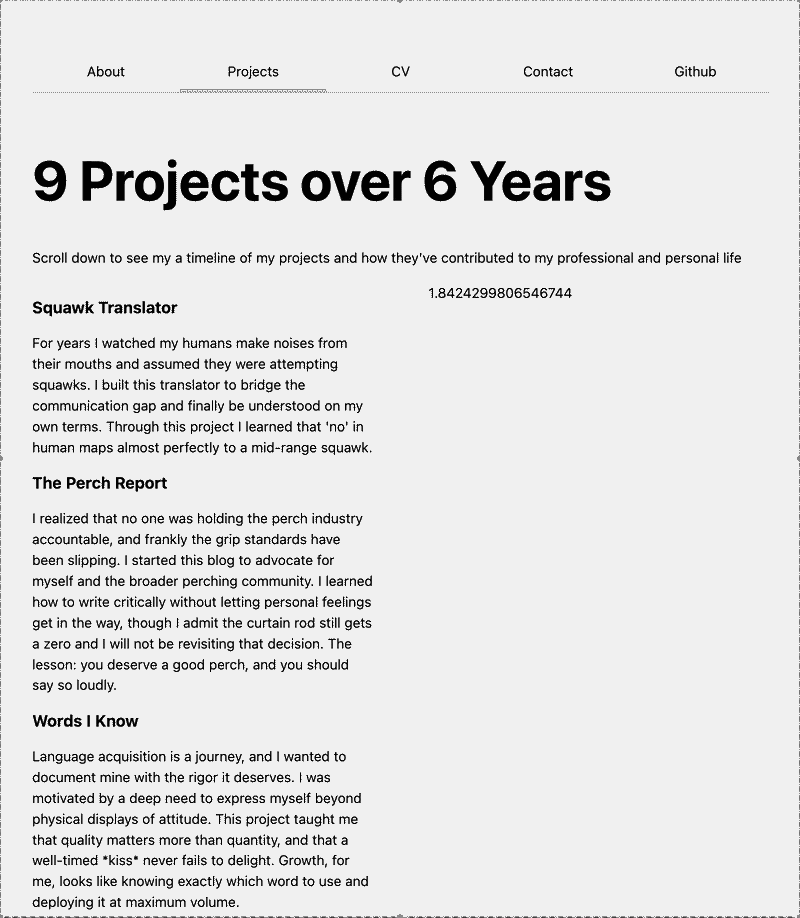
Notice that your scrollyProgress goes from 0 to 100 over the course of your scrolling through the narrative.
Step 2.6: Sorting Projects by Year
Eagle-eyed readers will notice that the order of the projects in the timeline is not chronological but in the order in which they were written in projects.json. Let’s fix that!
Add this to your <script> in your ProjectNarrative component
let sorted_projects = projects.sort((a, b) => a.year - b.year)
This is our first encounter with the sort() method for arrays. You can just call array.sort() and get an ordered array if your array is full of numbers, but ours is full of objects that have a year property on them. So, we define a comparing function as the argument to the sort() function. In this function, if a.year is smaller than b.year, a will be ordered before b, and vice versa.
This is another arrow function! How many arguments does it take, and what does it return?
Now, replace every reference to projects in your ProjectNarrative component with sorted_projects. Now your projects should appear in order!
Step 2.7 Reactive Project Index
We’re going to want the project image matching the project story to appear on the right side of the scrolly at the right time. First, we want to decide how much of our scrollyProgress we want to dedicate to each project. The easiest way is to evenly distribute the projects across the scrollyProgress range:
let progressPerProject = 100 / sorted_projects.length;
Now our best friend the reactive statement returns, because we want to keep track of which project is being visualized along the path of the Scrolly, updating reactively based on scrollyProgress
Define a reactive variable activeProjectIdx using $:, and give it this value:
Math.min(sorted_projects.length-1, Math.floor(scrollyProgress / progressPerProject));
If you’re unsure of what to do, refer back to Lab 4!
This expression takes the minimum between two values: sorted_projects.length-1, and Math.floor(scrollyProgress / progressPerProject). if you’ve worked with python, this would be equivalent to min(len(sorted_projects)-1, scrollyProgress // progressPerProject). In JS, arrays are 0-indexed, so the final index in our sorted_projects array of length n is actually n-1. Next, we take the whole number result of dividing our current scrolly progress by the constant amount we decided each project took up. The minimum of those two expressions gets us the current active project index!
If you add {activeProjectIdx} to the “viz” side of your scrolly, you’ll see a number slowly increase from 0 to the number of projects you have (minus 1) as you scroll.
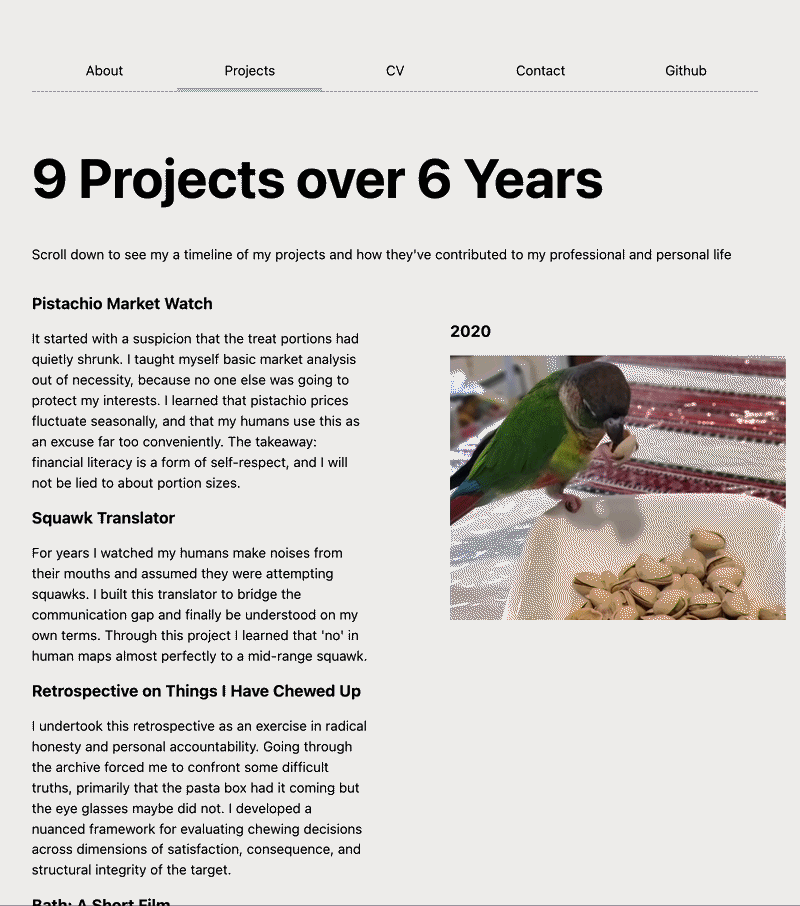
Step 2.8 Displaying one Project at a time
Now let’s actually define a viz for the right side of the scrolly!
Replace whatever you are currently printing in the <svelte:fragment> with a <div>. Make an <h3> showing the year of the project at the activeProjectIdx of sorted_projects, and make an <img> with a src property pointing to the image of the project at the activeProjectIdx of sorted_projects. Give the <img> a useful alt value, as well.
Step 2.9: Making it pretty with CSS!
Almost done! The skeleton is there, but the narrative pieces are too close together, and the project images scroll by too quickly. Let’s make this pretty with some CSS.
Because our scrolly involves a story next to a visualization, it feels a little squished, at least in large viewports. We can address that by wrapping everything in a <div class="scrolly-wrapper">, and creating a CSS rule in our <style> to add width just for the scrollytelling section of the page. This set of properties sets a wider width for the scrolly wrapper, and then moves the scrolly back to being centered on the page.
.scrolly-wrapper {
  width: min(1000ch, 60vw);
  position: relative;
  left: 50%;
  transform: translateX(-50%);
}
Next, you can update your CSS however you’d like, but this is what I did:
- Add
class="step"to your<section>in your narrative section, andclass="step-content"to the<div>inside. - Give the
"step"classmin-height: 80vh;andpadding: 2rem;. The extra height will let the projects progress more slowly. Give the"step-content"class a solid border on the left side the same color as my site accent color, andpadding: 1.5rem 2rem; - Give the
<div>inside your<svelte:fragment>the class"project-detail". Give the classpadding: 2rem;andwidth: 100%;. - Finally, if your images are too big, add a
width: 100%;or smaller to your<img>tag.
After all that hard work, revel in your completed Martini Stem! Next lab, we will begin building our Martini Bowl, where we give the reader free rein to explore our projects.
Cheat Sheet
We covered a lot of ground in this lab. Give yourself a pat on the back! Here’s a summary of what you encountered this lab:
JavaScript
- Callback functions (passing a function as an argument to another function)
- Arrow functions (e.g.
(arg) => { ... }) - Async functions and the
asynckeyword - The
awaitkeyword and why it’s needed - Promises
fetch()for making HTTP requeststry...catchfor error handling- The
map()method for arrays (e.g.projects.map(proj => proj.year)) - The
sort()method for arrays with a comparator function - The spread operator
...(e.g.Math.max(...years)) Math.max()andMath.min()Math.floor()JSON.stringify()
Svelte
- The
onMountlifecycle hook - The
{#if}/{:else if}/{:else}control flow block - Reactive statements with
$:(revisited) - The
bind:directive (revisited, e.g.bind:progress) - Importing and using external Svelte components (
svelte-scrolly)
Web / Browser Concepts
- What an API is and how to interact with one
- Asynchronous programming and why it’s needed
- Rate limiting
- Scrollytelling and the martini glass narrative structure
- npm and installing third-party packages
Scrollytelling
Cool Examples