Lab 3: Svelte (Templating & Control Flow)
In this lab, we will learn:
- What is Svelte and why is it useful?
- How does Svelte handle pages and navigation?
- How can we use Svelte control flows and templates to format data?
- How can we create and reuse Svelte components?
Table of contents
- Lab 3: Svelte (Templating & Control Flow)
- Check-off
- Lab 3 Rubric
- Prerequisites
- Slides
- What to Expect When You’re Svelting
- Step 1: Getting started with a template repository
- Step 2: Porting your previous website to Svelte
- Step 3: Publishing our new website to GitHub Pages
- Step 4: Control Flow Using Templates
- Step 5: Creating a Svelte Component
- Step 6: Practice — “What I’m Reading” Component
- Appendix: Creating a Svelte Project from Scratch
- Svelte and SvelteKit Resources
- JS resources
Check-off
Asynchronous lab checkoff is no longer one-and-done. To receive a lab checkoff, please submit your work asynchronously by filling out this form. TAs will review your lab and post your grade. If you do not pass, you will be able to fix any issues and resubmit or receive help in an office hour until the deadline.
Lab 3 Rubric
To successfully complete this lab check-off, ensure your work meets all of the following requirements:
- Same functionality from Labs 1-2, just ported to SvelteKit.
- Succesfully deployed to GitHub Pages.
- Correct file directory (pages are named correctly and placed in the correct folders).
- Home page includes a subset of projects.
- A “What I’m Reading” section appears on the homepage.
- At least 3 different reading items are rendered dynamically in a consistent layout.
- Each reading item includes:
- a title
- an author
- an image
- The DOM shows repeated structural elements (indicating a loop, not manual copy-paste).
Prerequisites
- You should have completed all the steps in Lab 0, i.e. that you have Node.js and npm installed. You will not need the local server from Lab 0, as SvelteKit will provide its own.
- This lab assumes you have already completed Lab 1 and Lab 2 as we will use the same website as a starting point.
Slides
What to Expect When You’re Svelting
Unlike the previous labs, this lab will not involve dramatic changes to the end-user experience of our website. In terms of user-facing changes, we will only be adding a section of the 3 selected projects to the home page, displaying a count of projects, and creating a “What I’m Reading” section on the homepage.
However, we will be completely re-architecting its internals to make it much easier to make changes and evolve it over time.
Step 1: Getting started with a template repository
For this lab, we have provided a template repository for you to start from, where we have created a Svelte project with the basic layout of your portfolio website. In this step, you’ll create your own repository from this template. If you’d like to know how to create a Svelte project from scratch, instructions are in the Appendix.
Step 1.1: Creating your own repository from a template
- Visit the template repository at this link and select
Use this template→Create a new repositoryin the top right corner. Choose a name and visibility, and clickCreate repository. - Now, we want to clone this repository to your computer so we can browse it in VSCode and work on it. You can do this either in GitHub Desktop using
File→Clone repository...or from the command line usinggit clone https://github.com/[your username]/[your repository name].git(you can copy the exact url underCodeon your repository page).
Step 1.2: Installing dependencies and viewing the site locally
Then open your new project in VS Code. You can do this by going to GitHub Desktop and using Repository → Open in Visual Studio Code.
Open the VS Code terminal and run:
npm install
This will install all the dependencies for your new Svelte project. Specifically, this command reads dependencies from package.json and installs the packages listed there. Be patient, it can take a while!
Once npm install finishes, run:
npm run dev -- --open
This will start a local server on port 5173 and open http://localhost:5173/ in your default browser.
You should see something like this: 
As a bonus, we don’t need to refresh the page to see HTML changes anymore! Vite (used by SvelteKit under the hood) implements hot reloading, i.e. it will automatically reload the page when we save a file. You could even arrange VS Code and the browser side by side and see your changes in real time!
Note, however, that you may need to refresh or hard refresh (Ctrl+Shift+R or Command+Shift+R on Mac) to view styling changes due to how browsers cache stylesheets.
You might see a NotFound [Error]: Not found: /style.css. The website will still deploy, and the error will disappear in the next step when we add our style.css!
In this class, we will only be using Svelte 4. Be careful when installing or working with Svelte, as the latest Svelte 5 update will not be compatible with the instructions of this lab. It’s imperative to follow the instructions for terminal commands exactly in this lab, so you are only installing Svelte 4 and its compatible dependencies. Later on, you can check what version you are using by running npm list svelte in your command line.
Step 2: Porting your previous website to Svelte
Now we will start porting the website we created in Labs 1-2 to Svelte, piece by piece.
Step 2.0: Moving your assets
First, copy your images/ folder as well as style.css to static/. You can do this in your own File Explorer or in VS Code!
Step 2.1: Porting your pages to routes
“Routing” is the process of determining what content to display based on the URL. To do that, SvelteKit uses a routes directory, with +page.svelte files for each page. These are actually components, which we will learn about and use in Step 5. However their special name tells SvelteKit that they are meant to be used as pages.
Open the routes directory. You will see that in this template we have replicated the directory structure of your portfolio website from Lab 2, except instead of index.html files we have +page.svelte files.
If you prefer to name your pages and corresponding URLs differently (e.g. cv instead of resume), rename the corresponding folder now.
A Svelte page represents a route and defines the structure, logic, and styling for a page. Each consists of three main parts in chronological order:
- A
<script>element for Javascript logic and data. (Javascript is a programming language used to add interactivity to websites. We’ll learn it as we go along, but in this lab we’ll only use it to import data and components.) - Its HTML to display content.
- A
<style>element for CSS that will only apply to that page.
Replace the contents of the homepage (<h1>Welcome to SvelteKit...) with the contents of your homepage from your old site, i.e. the contents of the <body> element in your root index.html.
If you get an error like <tag_name> is a void element and cannot have children, or a closing tag, this just means that in Svelte, you don’t need a closing tag for tag_name elements. You can resolve this error by deleting the closing tag </tag_name>. With this fix, the website should now compile!
View your website and verify this worked. For the other pages, we have started each one with a default title in Svelte’s syntax; feel free to change these. For these pages, again copy the contents from your old site and paste them below the title:
projects/index.html→routes/projects/+page.svelteresume/index.html→routes/resume/+page.sveltecontact/index.html→routes/contact/+page.svelte
Again, for each of them only copy the HTML between <body>…</body>, excluding the <body> opening and closing tags.
View your website. It should largely look the same as before, but it is now a SvelteKit app!
Our navigation doesn’t work yet; we will fix it in the next step. You can still manually going to http://localhost:5173/projects or http://localhost:5173/contact to test that your pages look the way you want them to.
Svelte allows us to provide elements in a <svelte:head> element that will be used to insert elements into the <head> of the page at build time. This is placed after the <script> element (if present) and at the top of the HTML portion of the file.
Other elements in the <head> are set in src/app.html, which contains skeleton HTML for every page on your website. We’ve populated this with a link to your style.css and a default title (Portfolio); feel free to edit this too. Notice that this file has some expressions in %...%. These are special variables that Svelte will replace with the actual content of your pages at build time. Do not remove them!
Step 2.2: Adjusting navigation bar URLs
Note that our navbar doesn’t work as it still points to index.html pages from Lab 2; let’s fix this!
In Svelte, every relative URL is interpreted as relative to the same folder, so we don’t have to handle the home page in any special way. The nav links will be the same on each page; the only thing that should change is which is assigned class="current"
Also, Svelte does not let us add / at the end of URLs (note that if you try to go to e.g. http://localhost:5173/projects/ you will be redirected to http://localhost:5173/projects).
As a result, you should remove index.html in your links, along with any preceding dot pairs .. or trailing slashes.
You should also change the URL of the homepage to . or ./, as it should not be empty: an empty URL is interpreted as equal to the current page URL.
Here’s an example of what my nav object looks like:
<nav>
    <a class="current" href=".">Home</a>
    <a href="projects">Projects</a>
    <a href="contact">Contact</a>
    <a href="resume">Resume</a>
    <a href="https://github.com/nicolatl" target="_blank">GitHub</a>
</nav>
The browser doesn’t know anything about your directory structure, so it doesn’t know that projects/ is a directory. It figures out what is a file and what is a directory entirely from the URL. So when you visit something like https://username.github.io/portfolio/projects, it will just treat projects as a file in the same directory — a file with no extension. This means that if we did want to add subpages (e.g. projects/viz/), we would have to do some work to handle this, but let’s cross that bridge when we get to it.
The first time you click through your nav, you might have trouble clicking between the pages and get to some 404 Errors. This should only happen the first time. This is okay and we will fix it in the next lab.
Step 3: Publishing our new website to GitHub Pages
Now that we have a website that functions like our old one, it’s a good time to publish it to the Web.
Deploying to GitHub Pages is a little more complicated than in the previous labs, because we now have a build process. As we edit our website, SvelteKit generates a bunch of files from our source code and stores them in a .svelte-kit folder. It is generally considered a bad practice to commit automatically generated files (“build artifacts”) to a repository, as makes every edit correspond to several other edits we didn’t make, complicating and bloating the commit history.
Instead, we want to ignore these files when committing to our repo (that’s why .svelte-kit is already in our .gitignore file) and tell GitHub to generate those files again on its side.
To run custom logic before our site is deployed, GitHub provides a feature called GitHub Actions, which we will use.
If you are working out of an MIT GitHub Enterprise account, GitHub Actions is not included in this. Make sure to port your repo to a personal account!
Before you proceed, commit and push your changes, then on github.com, enable GitHub Pages on your repo selecting “Github Actions” as the source (Repo settings → Pages → Source: GitHub Actions).

SvelteKit has a detailed guide on how to deploy to GitHub Pages. Copy the code linked below for the following files:
.github/workflows/deploy.yml(you will need to create a.githubfolder in your root directory — note the dot — and aworkflowsfolder inside it)svelte.config.js(this will replace the Svelte config file already in your project).
You can also click on the file paths above to download the files, if that’s more convenient for you.
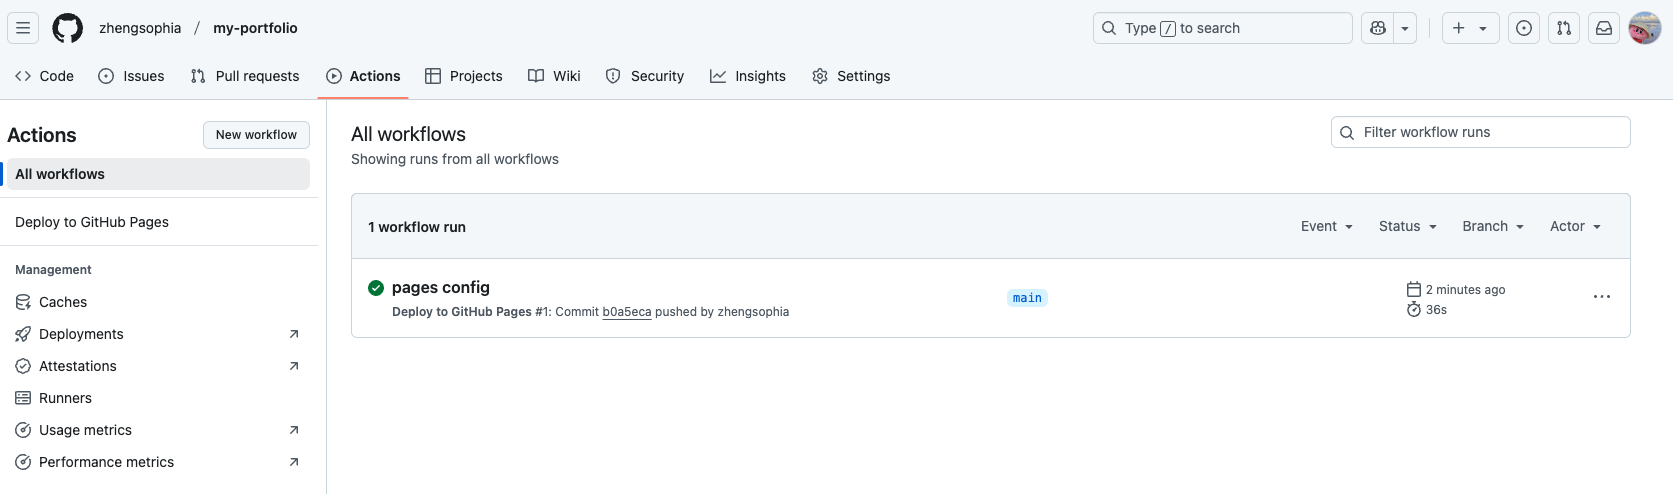
Commit and push these changes to your repo.
If all goes well, your app should be deployed to YOUR_USERNAME.github.io/REPO_NAME. To see our GitHub Action deployed, navigate to the “Actions” tab on your GitHub repo. You’ll be able to see both actions that are currently running, as well as past ones.
Step 4: Control Flow Using Templates
In the previous labs, we were using a hardcoded blob of HTML to display our projects. This is not ideal: if we want to change the HTML for our projects, we have to do it N times, where N is the number of projects we have. Now, it is true that if we design our HTML well, we should be able to change its style without changing its structure, but there are many changes we may want to make that would require changing the structure of the HTML. And even the most well written HTML is no help when we want to display the same data in multiple ways. For example, what if we wanted to display our projects on the homepage as well? Or provide a data file for others to use? Or draw a visualization of them? Maintaining our data together with its presentation tends to become painful, fast.
Step 4.1: JSON Objects and Arrays: Storing our Projects
Instead of hardcoding our project data directly in HTML, we’re going to store it in a separate JSON file.
JSON (JavaScript Object Notation) is the primary format for saving and using structured data in Javascript. This data is stored in key-value pairs like so:
"key": "value"
These key of key–value pairs can be collected into objects, which are a collection of key-value pairs surrounded by curly braces {}. Here’s an example of an object:
{
  "property1": "value1",
  "property2": "value2"
}
Notice how the list of projects in Lab 2 was within a <div class="projects> and each project looked like this:
<article>
  <h2>Project title</h2>
  <img src="path/to/image.png" alt="" />
  <p>Project description</p>
</article>
The HTML structure tags remain the same, and the only things that change for each project are the title, image link, and description. We can easily store these three variables in a JSON object:
{
  "title": "Project title",
  "image": "path/to/image.png",
  "description": "Project description"
}
We’ll store a list of all of our projects in a JSON array. An JSON array is a comma-separated list of items surrounded by square brackets []. Arrays have special properties that allow us to loop through them, access particular elements, and read their total length, as we’ll see in these substeps.
Create the folder /lib in /src and create a file called projects.json in src/lib.
Inside it, create an array containing one object for each of your projects. Use the structure shown above, and copy the relevant information from your existing HTML.
For example:
[
  {
    "title": "My First Project",
    "image": "/images/project1.png",
    "description": "This project explores..."
  },
  {
    "title": "My Second Project",
    "image": "/images/project2.png",
    "description": "In this project, I..."
  }
]
In this example:
- The outer
[]means this is an array. - Each
{}inside the array represents one project (stored as an object). - Each project has three properties:
title,image, anddescription.
JSON requires double quotes around property names and string values.
Save the file when you’re done.
Having trouble?
If you're having trouble formatting your JSON correctly, you can use thisprojects.json file as a starting point. Step 4.2: Importing our project data into our Projects page
Create a <script> element at the top of src/routes/projects/+page.svelte and import the JSON file:
<script>
  import projects from "$lib/projects.json";
</script>
This is our first line of Javascript: an import statement.
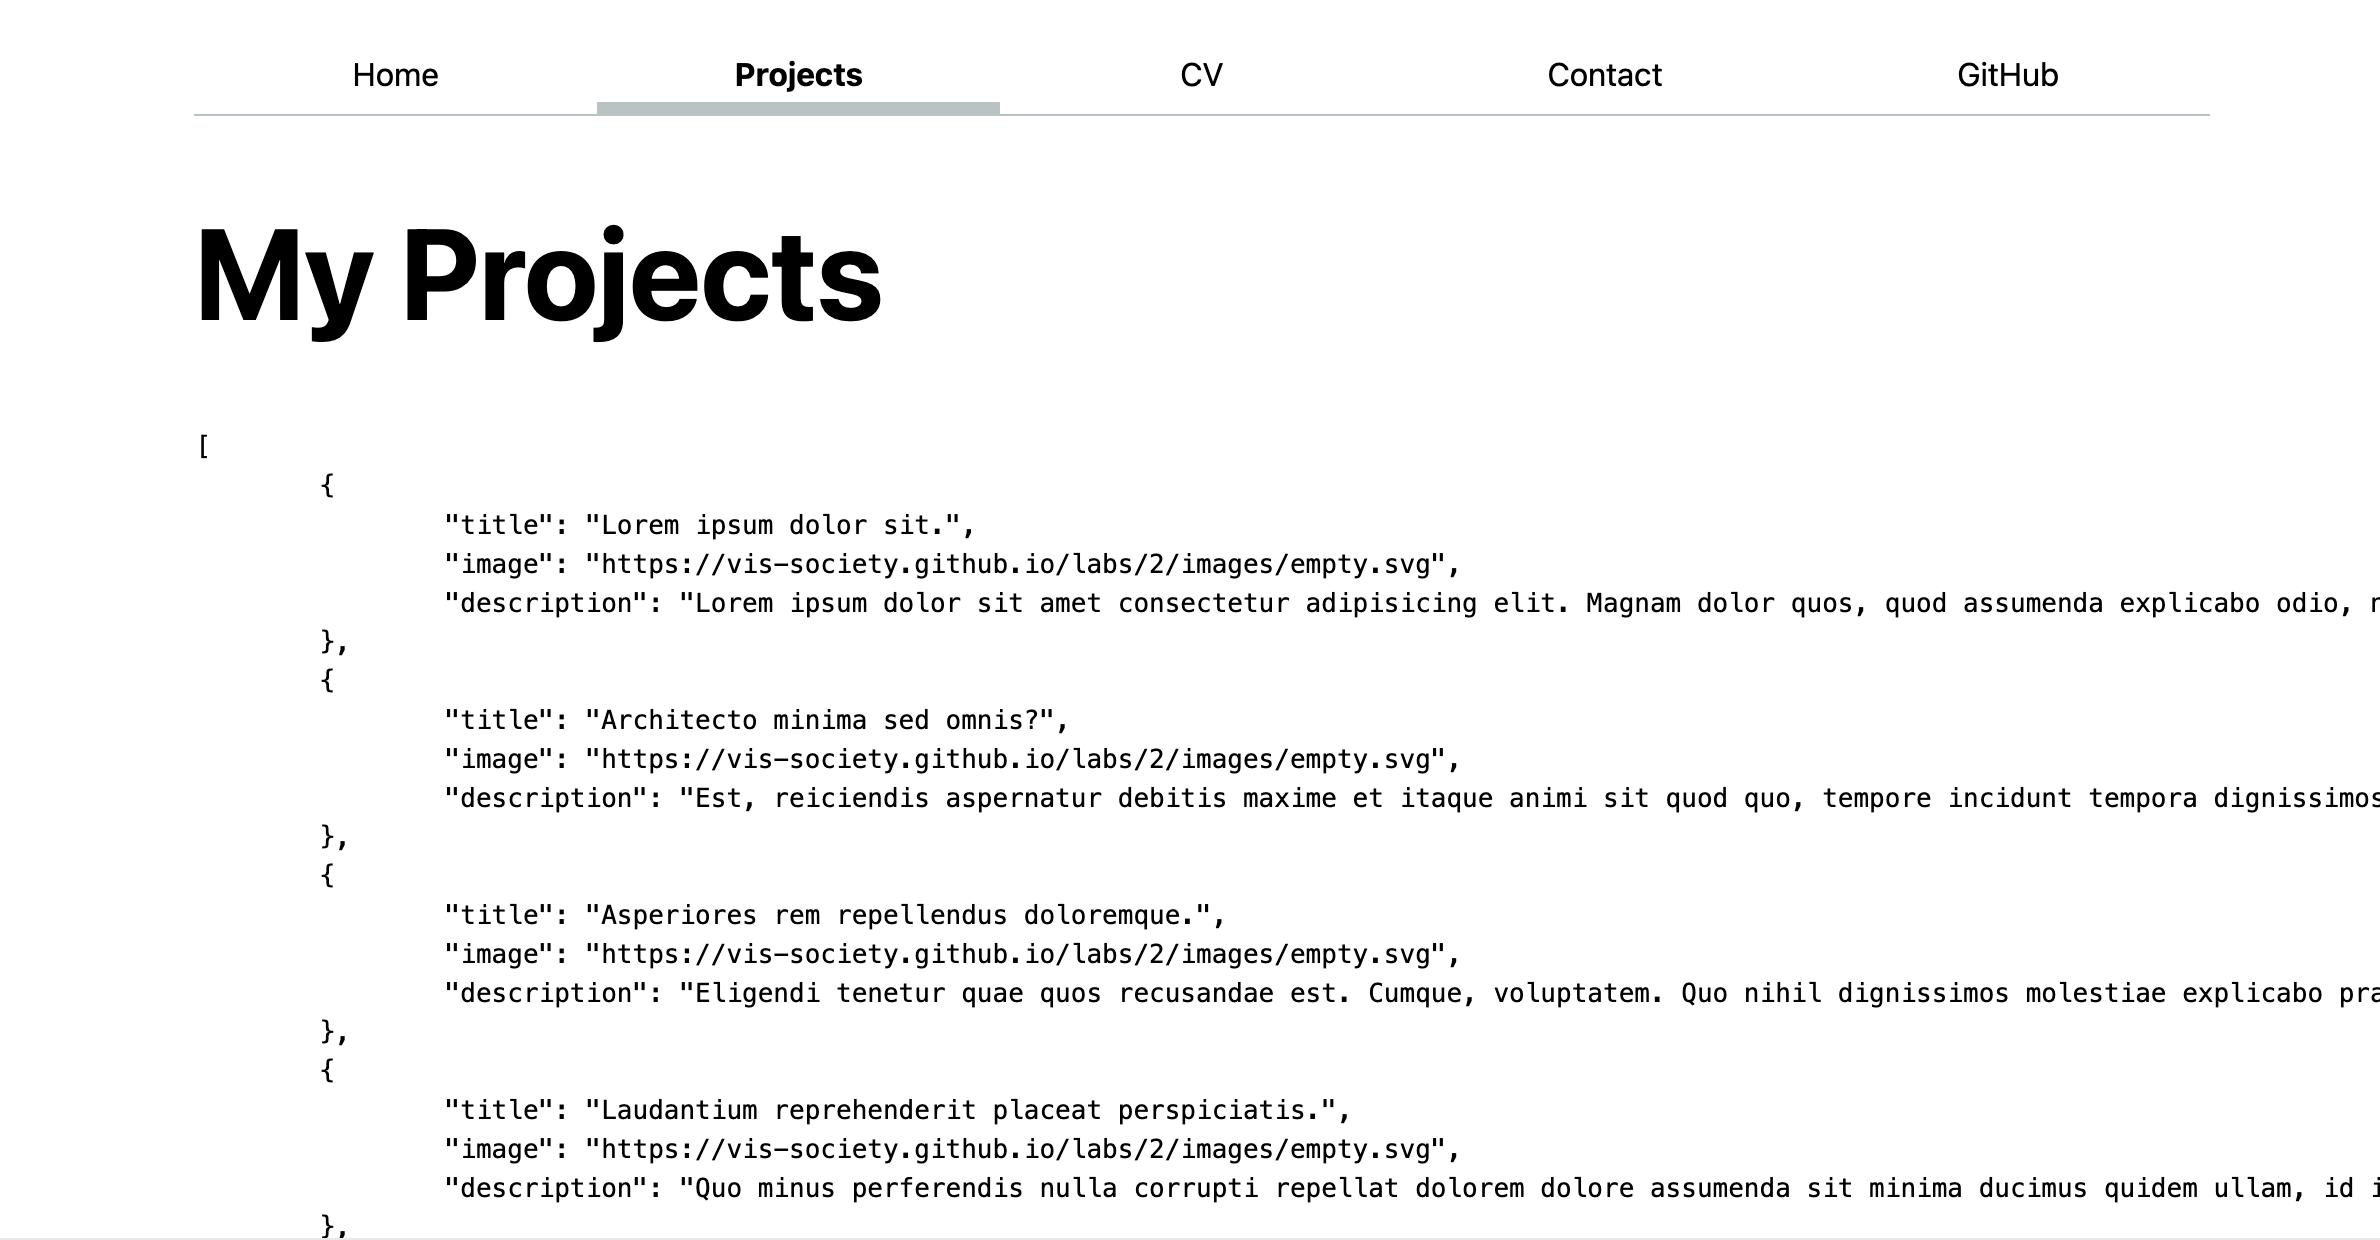
Print it out on the page to make sure everything worked by adding <pre>{ JSON.stringify(projects, null, "\t") }</pre> anywhere outside the <script> element, e.g. under our heading. If it worked, you should see something like this:
Delete this debug code, and let’s use the data to display our projects in a more …presentable way.
Step 4.3: Control flow with {#each}
First, delete or comment out all your <article> elements inside the <div class="projects"> element except the first one. This will be our template.
Now, we want to make this appear multiple times across the page. Svelte allows control flow that allows us to make content appear repeatedly (iterative rendering), or if only certain conditions are met (conditional rendering).
{#each} is an example of control flow that allows us to do something for each item in a list. Add an {#each} block block around your template to iterate over the projects.
<div class="projects">
  {#each projects as p}
    <article>
      <h2>Lorem ipsum dolor sit.</h2>
      <img src="https://vis-society.github.io/labs/2/images/empty.svg" alt="" />
      <p>
        Lorem ipsum dolor sit amet consectetur adipisicing elit. Magnam dolor quos,
        quod assumenda explicabo odio, nobis ipsa laudantium quas eum veritatis
        ullam sint porro minima modi molestias doloribus cumque odit.
      </p>
    </article>
  {/each}
</div>
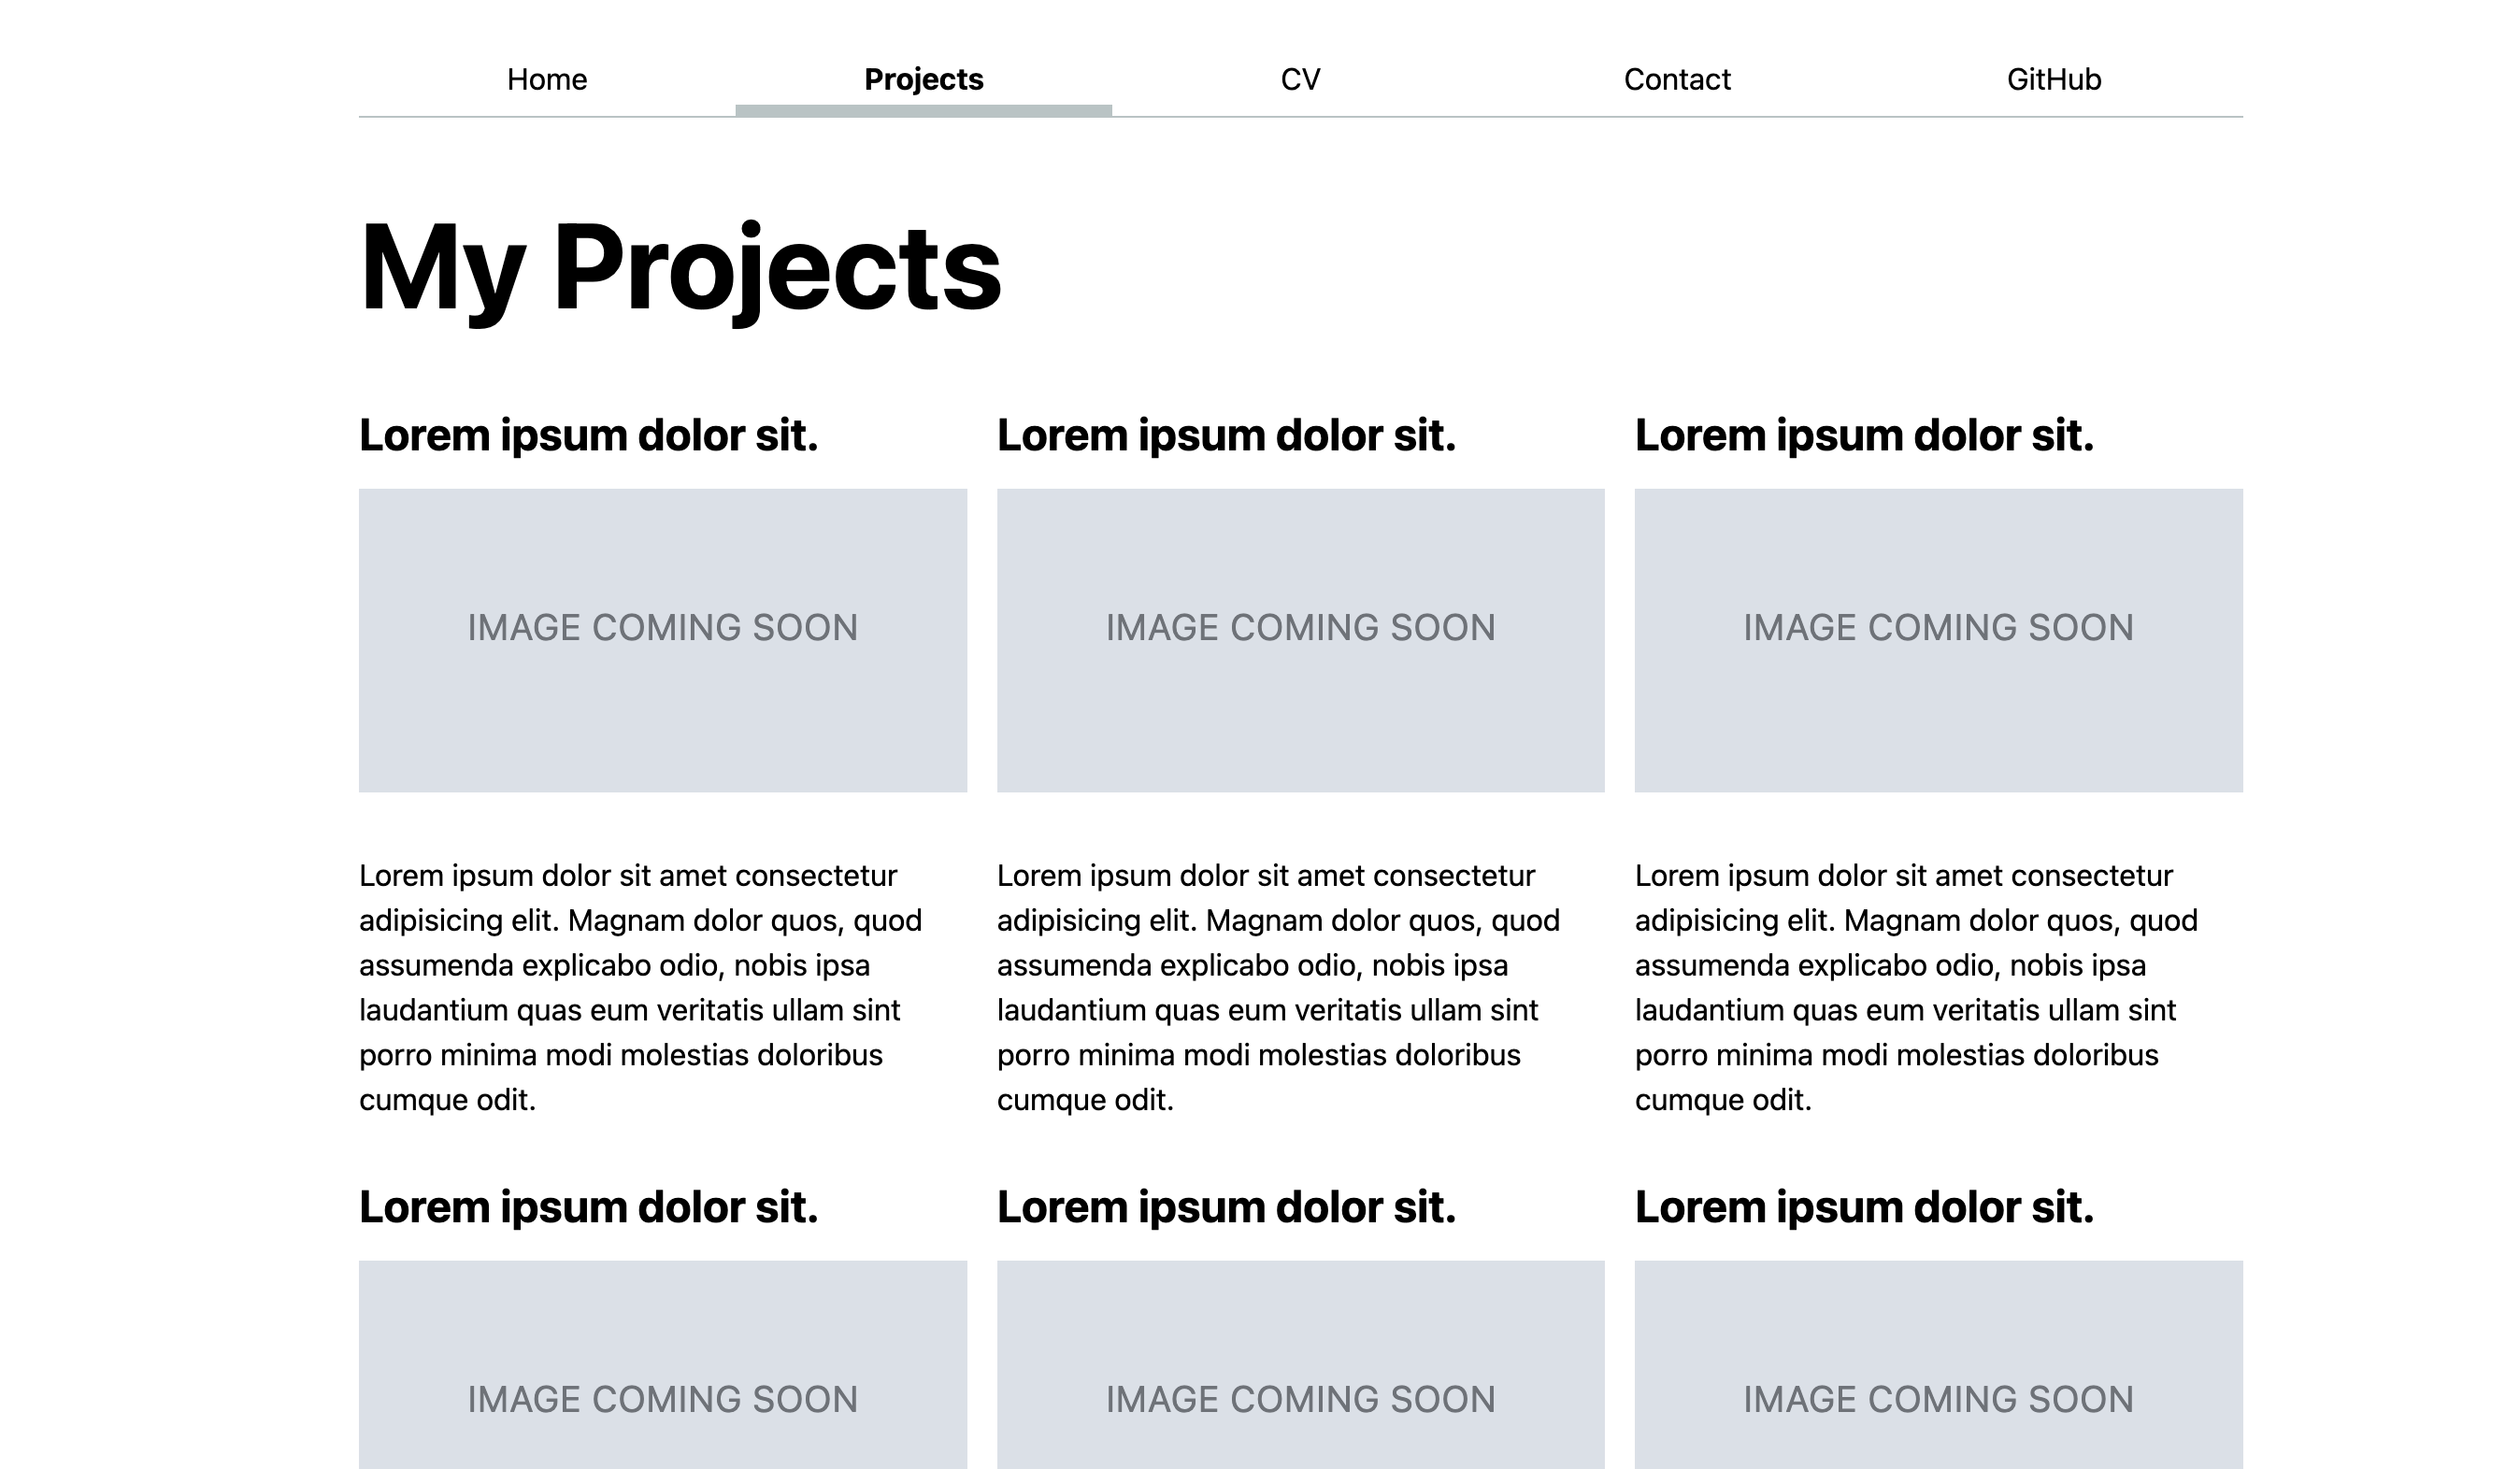
If you view your website at this point, you should see the same project repeated as many times as there are projects in your JSON file.
Step 4.4: Using variables to populate the template
Now, we want this template to show all our projects on the page, not just the first project. Svelte allows us to put text expressions in HTML templates using curly braces like so:
{expression}
Javascript allows us to access the properties of our project p using dot notation. For example, to access the corresponding project title of p in your HTML, use
{p.title}
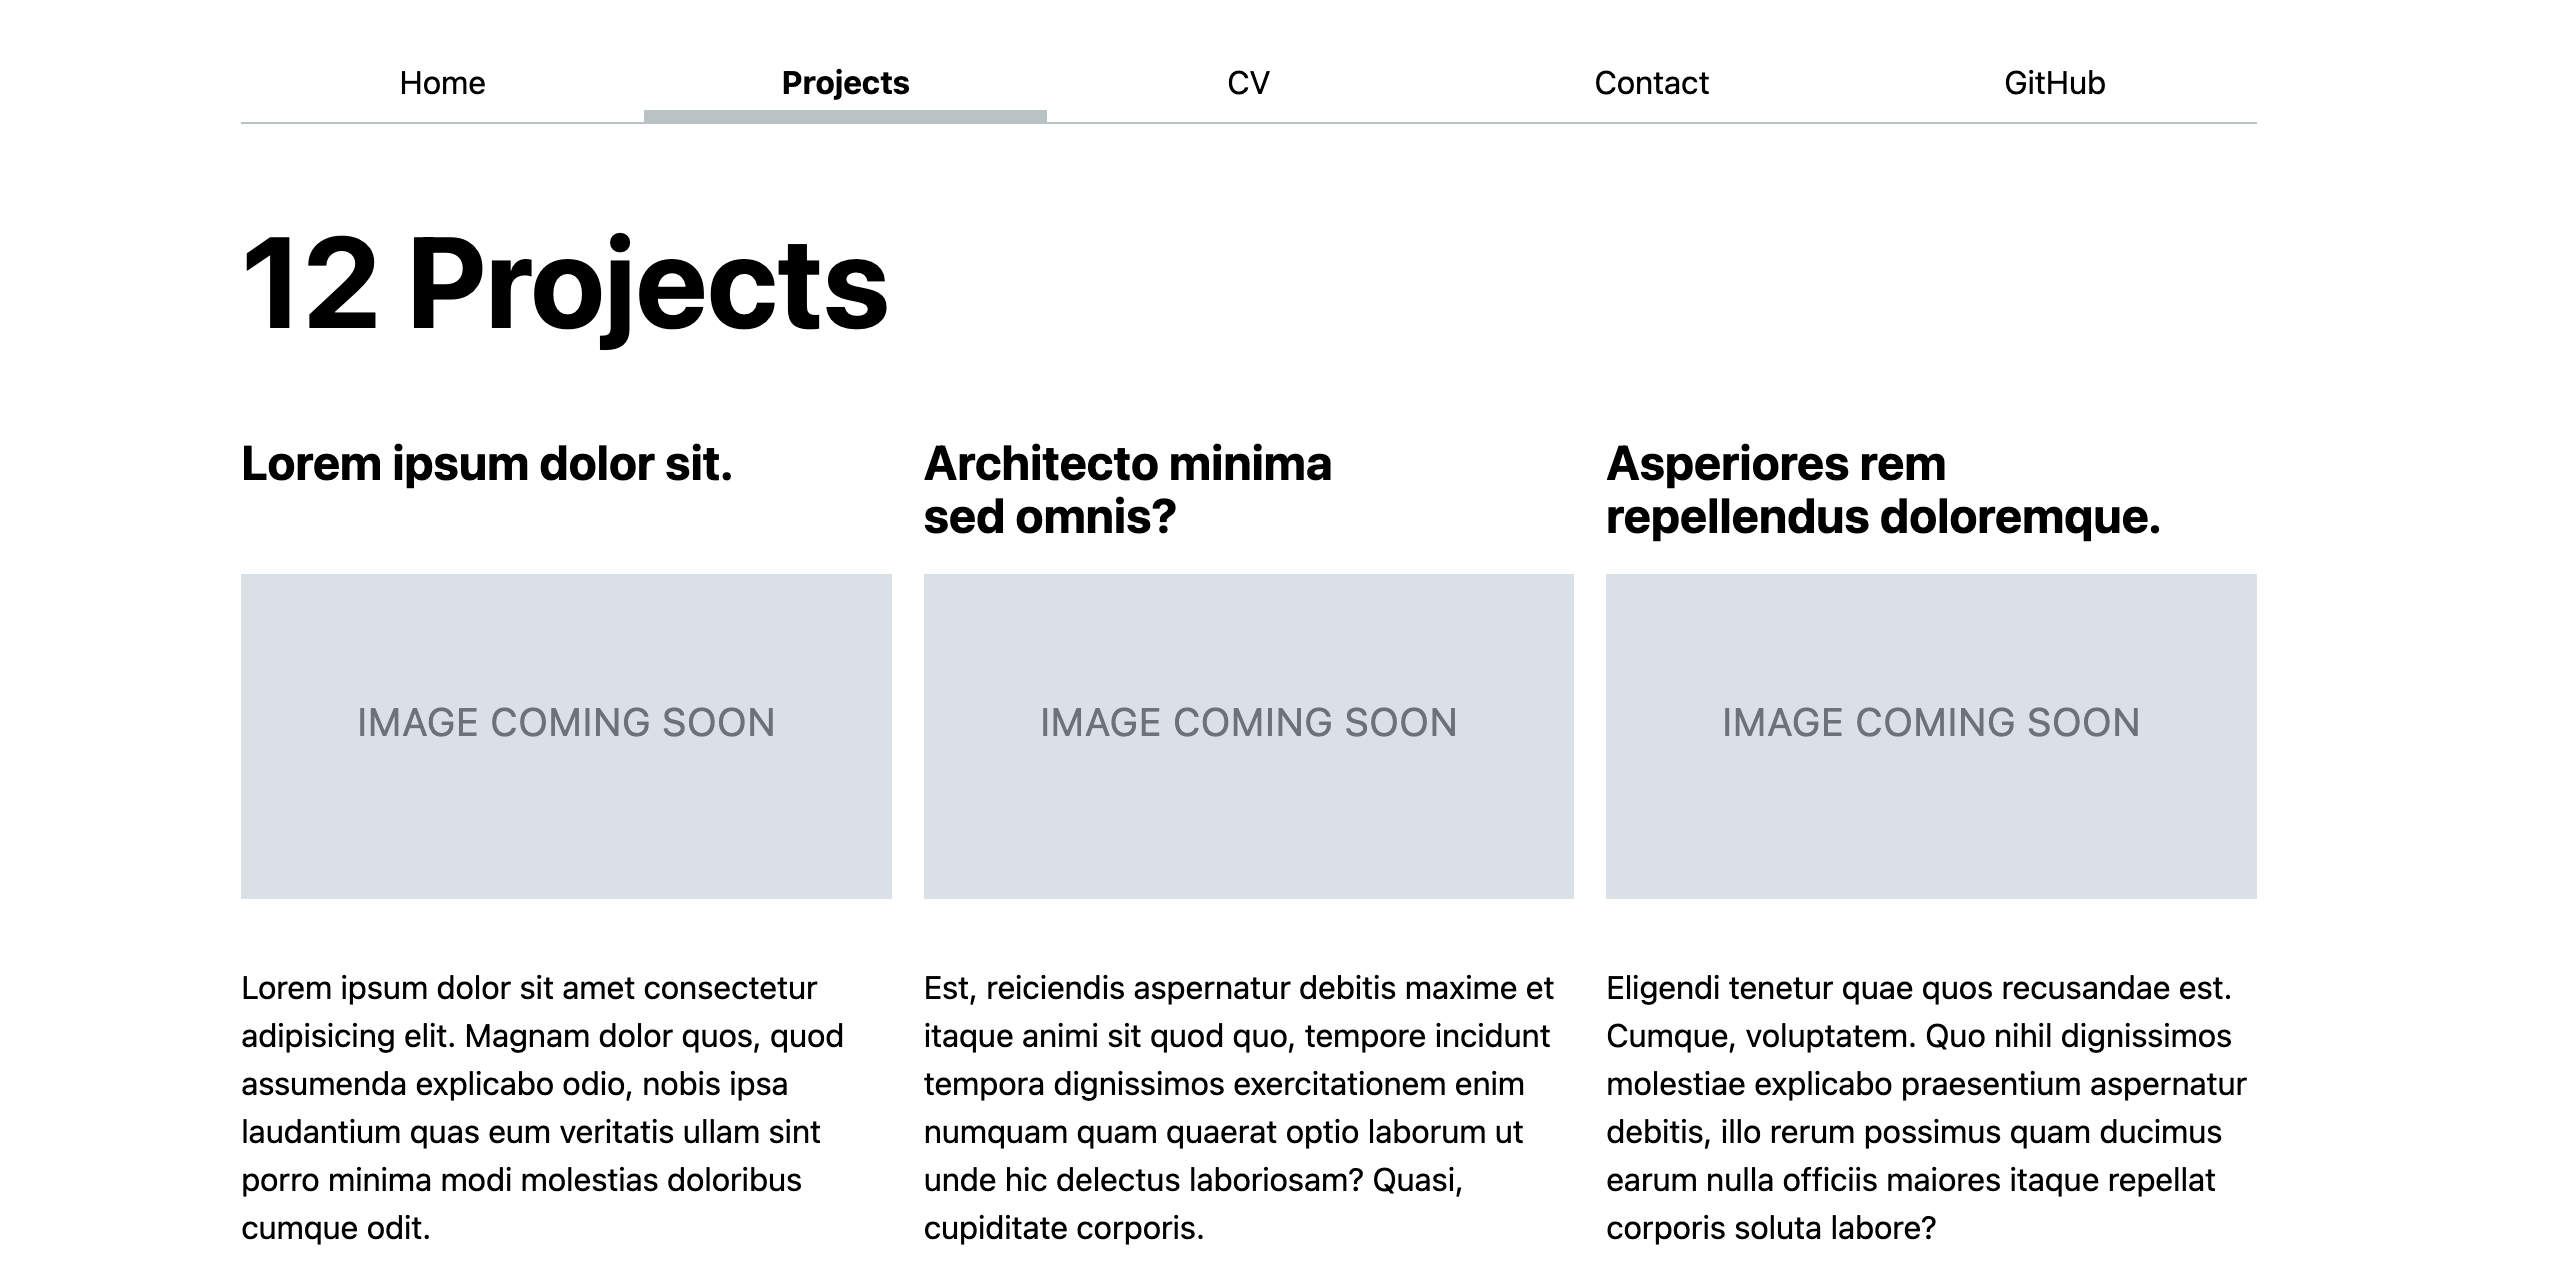
So now, in your template, replace the project title with {p.title}, its image’s src with {p.image}, and its description with {p.description} and view your website.
Note that we don’t need quotes to use an expression as an attribute value in Svelte, i.e. we can do src={p.image}, we don’t need to do src="{p.image}", though the latter can be helpful for combining expressions with static text, e.g. href="/{ p.url }". Read Svelte’s full docs on attributes and props to learn more.
It should look the same as before, but now your projects are templated from a JSON file! Try making an edit to your JSON file and see if it reflects on your website.
Step 4.5: Counting projects using the array .length property
A big bonus of this approach is that we can use code to compute things from the data, and have it update automatically when the data changes.
Javascript stores a length property for arrays, which holds the total length of the array. Try it: add a count of projects at the top of the page by adding { projects.length } in the <h1> element.
Step 5: Creating a Svelte Component
We will now display the first 3 projects on the home page. We could do this by copying the project template from the Projects page and pasting it into the home page. However, this means that if we want to change it (e.g. add a date), we’d need to change it in two places.
That’s precisely what components are for!
Components encapsulate an independent piece of UI, and can be reused across your app. Each component lives in a single .svelte file and consists of three parts:
- Its JavaScript (placed inside a
<script>element) - Its HTML (placed directly inside the file). As we have seen, this is not plain HTML, but it has superpowers: it can contain expressions and logic.
- Its CSS (placed inside a
<style>element). Any CSS you write here is transformed to only apply to that component, even if you use very generic selectors.
The +page.svelte files you populated in Step 2 are also components!
Step 5.1: Creating a <Project> component
We will create a <Project> component that will take the project data as input so that we can use it anywhere we want like this:
<Project data={project} />
Standard Svelte naming conventions include PascalCase (capitalize first letters) for Components and +lowercase for Pages.
Start by copying the <article> element and its contents into a Project.svelte file in src/lib.
In larger projects, components are placed in a lib/components directory to distinguish them from other files in lib. However, we’ll stick to a shallow directory structure for now to keep things simple.
Then add a <script> element to the top of the same file with:
export let data = {};
The Javascript command let creates a variable that can be set from outside, creating dynamic updates and allowing the variable to be reupdated later. Prefacing our variable with export will allow us to recognize data in other files.
This defines what prop name other files use to pass data to our component and what the default value is (in this case an empty object). Props are values passed to components to then be utilized in those components.
We should now change all expressions in our template to use data instead of p (e.g. { p.title } becomes { data.title }).
Step 5.2: Using the <Project> component
Now that we’ve created our component, let’s use it!
First, we’ll use it on the Projects page routes/projects/+page.svelte. To make it available to the page, we need to import it in the <script> element at the top of the file:
import Project from "$lib/Project.svelte";
Then, we can replace the <article> element and its contents with:
<Project data={p} />
Step 5.3: Using the <Project> component on the home page
Now that we’ve used the Project component on the Projects page, we can use it on the home page as well.
Copy the <script> element and its contents from the Projects page and paste it at the top of the home page, since we’ll need exactly the same imports: the project data and the Project component.
Then to display the first 3 items we can use a Javascript function called slice() that returns a smaller section of an array. Here, you can make an {#each}...{/each} block very similar to that of the Projects page, just using projects.slice(0, 3) instead of projects.
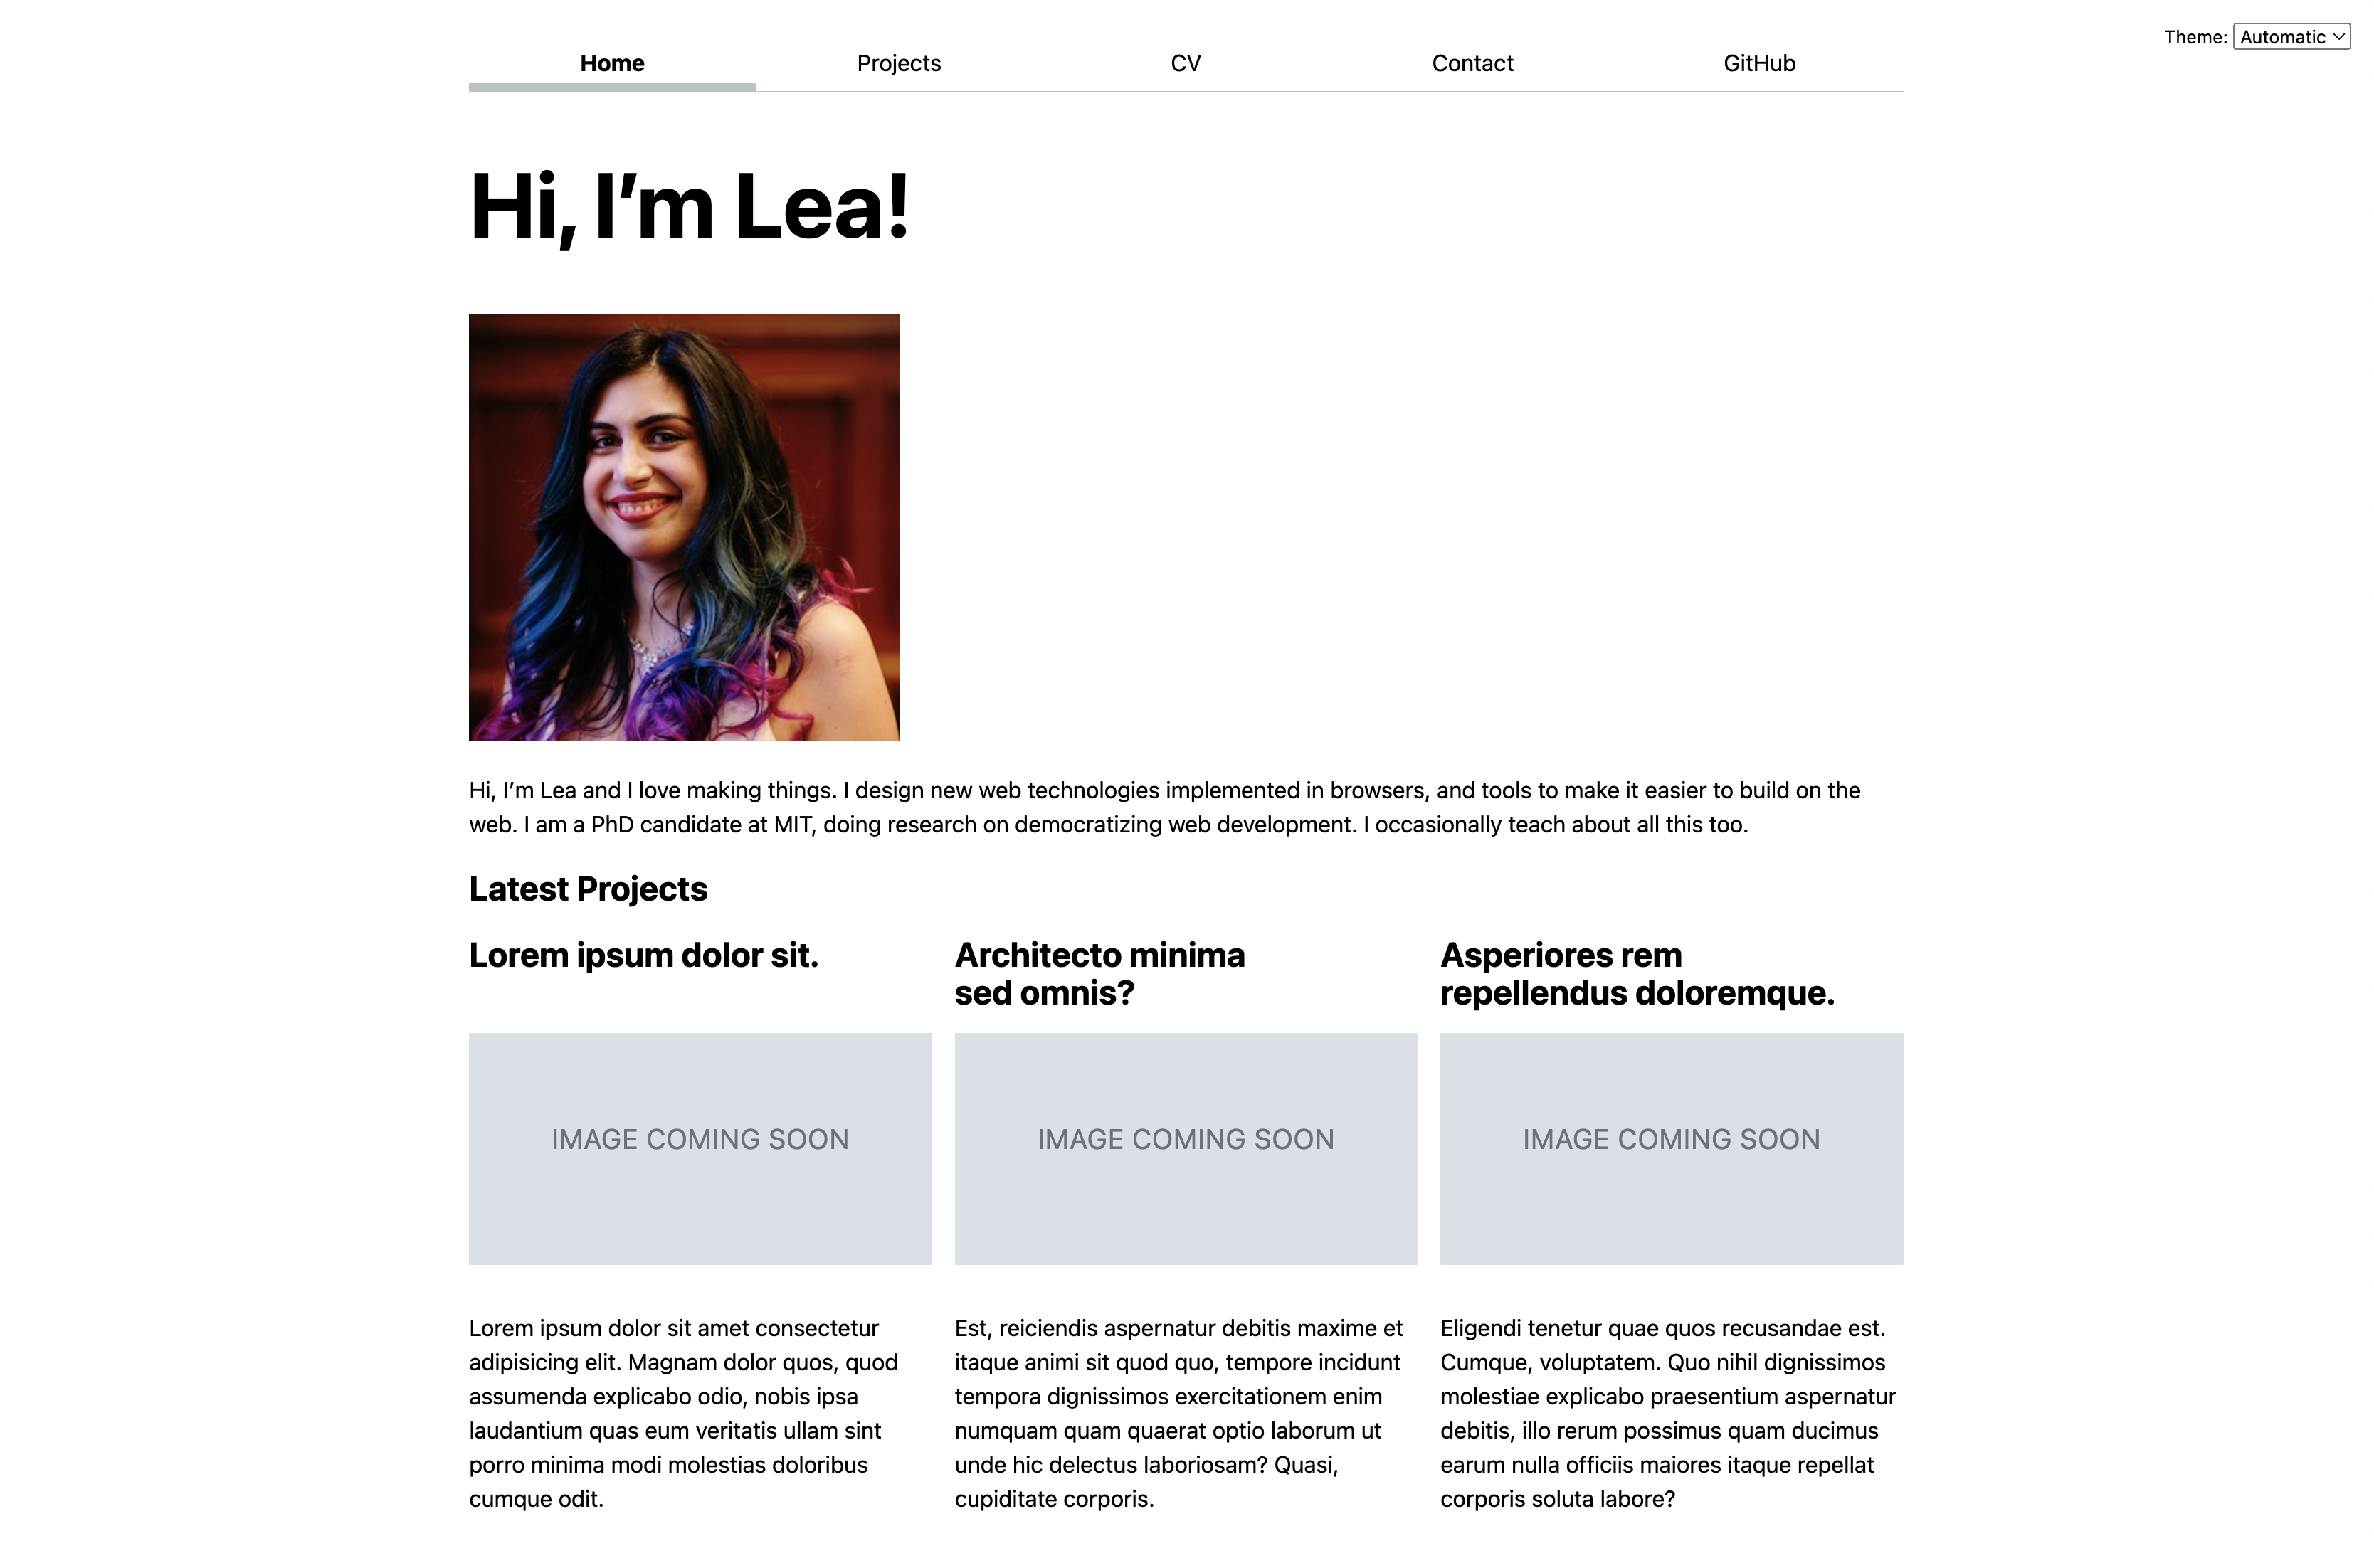
{#each projects.slice(0, 3) as p}
<Project data={p} />
{/each}
You should also add a heading of a suitable level (e.g. “Latest projects”) and wrap the three projects in a <div class="projects"> element so that they get the same styling (you may want to add another class too, e.g. <div class="projects highlights"> to style them a little differently there).
Want to display selected projects rather than the first three? You can use a new array like [projects[0], projects[3], projects[7]] instead.
In Javascript, projects[i] gets the i-th element of an array. Arrays are 0-indexed, meaning that i=0 for the first element.
Step 5.4: Moving Project-specific CSS to the Project component
The idea of component-driven design is that any code that is specific to a component should live in that component. You previously wrote code in the global CSS file style.css that is styling specific to the Project component, so let’s move this code to Project.svelte inside a <style> element at the bottom of the file.
This could include the CSS styling you created for article {...}, img {...}, etc.
Svelte automatically rewrites this CSS to ensure it never applies to anything that is not part of the component, so you can use define styling for simple selectors like article and not have to worry that this styling will bleed into those elements in other components.
Step 6: Practice — “What I’m Reading” Component
So far, we followed a fairly detailed walkthrough of:
- Moving data into a JSON file
- Using
{#each}for templating - Creating and reusing a component
Now it’s your turn to apply the same ideas with less guidance.
We are going to create a “What I’m Reading” section on the homepage. This section should display a list of books, articles, papers, blog posts, etc. that you are currently reading (or have recently read).
Step 6.1: Create a new data file
Create a new JSON file in src/lib/.
You can name it reading.json or something similar.
It should contain a JSON array of objects, similar to projects.json. Each object should represent one reading item.
At minimum, each item should include:
- A
title - An
author - An
image(book cover, article thumbnail, etc.)
You may optionally include additional properties (e.g. link, year, description, etc.).
This step should feel familiar. If you’re unsure how to structure the file, revisit Step 4.1 and projects.json.
Step 6.2: Create a new component
Create a new component in src/lib/.
You can call it ReadingItem.svelte or something similar.
This component should:
- Accept a prop (similar to
Project.svelte) - Render the reading item’s title, author, and image
- Contain its own
<style>block for any reading-specific styling
You should not copy the Project component — instead, adapt the pattern.
If you’re unsure how to pass data into a component, revisit Step 5.1.
Step 6.3: Display your reading list on the homepage
Now update your homepage (routes/+page.svelte).
You will need to:
- Import your new JSON file.
- Import your new
ReadingItemcomponent. - Add a new section to the homepage (with an appropriate heading, e.g. “What I’m Reading”).
- Use an
{#each}block to render all items in your reading list.
You should wrap the list in a container element (e.g. <div class="reading">) so that you can style it if needed.
You are not given starter code for this step — use the Projects example as your guide.
You should now have:
- A second JSON data file.
- A second reusable component.
- A new templated section on your homepage.
- At least one use of control flow (
{#each}or{#if}).
If everything is working correctly, editing your reading.json file should automatically update the homepage.
Here is an example of what this might look like before styling:
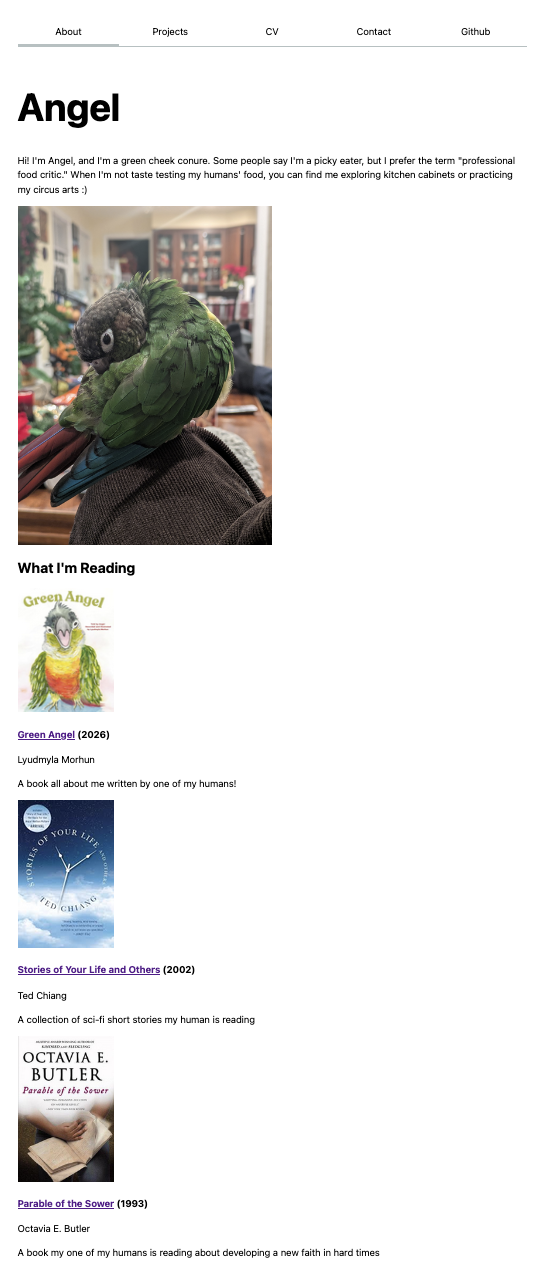
You don’t need to add years, links, or descriptions, but you are welcome to!
Step 6.4: Apply styling (Optional but recommended)
In the above image, there is no information hierarchy: images, titles, and authors are all shown left-aligned, looking more or less the same and without clear separations between the reading items. Applying styling can help the audience to understand how details are related (e.g. which title corresponds to which book).
In this case, we’ve put the reading details to the right of the image to show their association, and applied different text styling to the title, author, and description to clearly differentiate each property. We’ve also moved the reading list to be beside the image and description. To do this, you might need to create some new <div> elements and use display: flex;. Here is a helpful guide to flexbox layout.
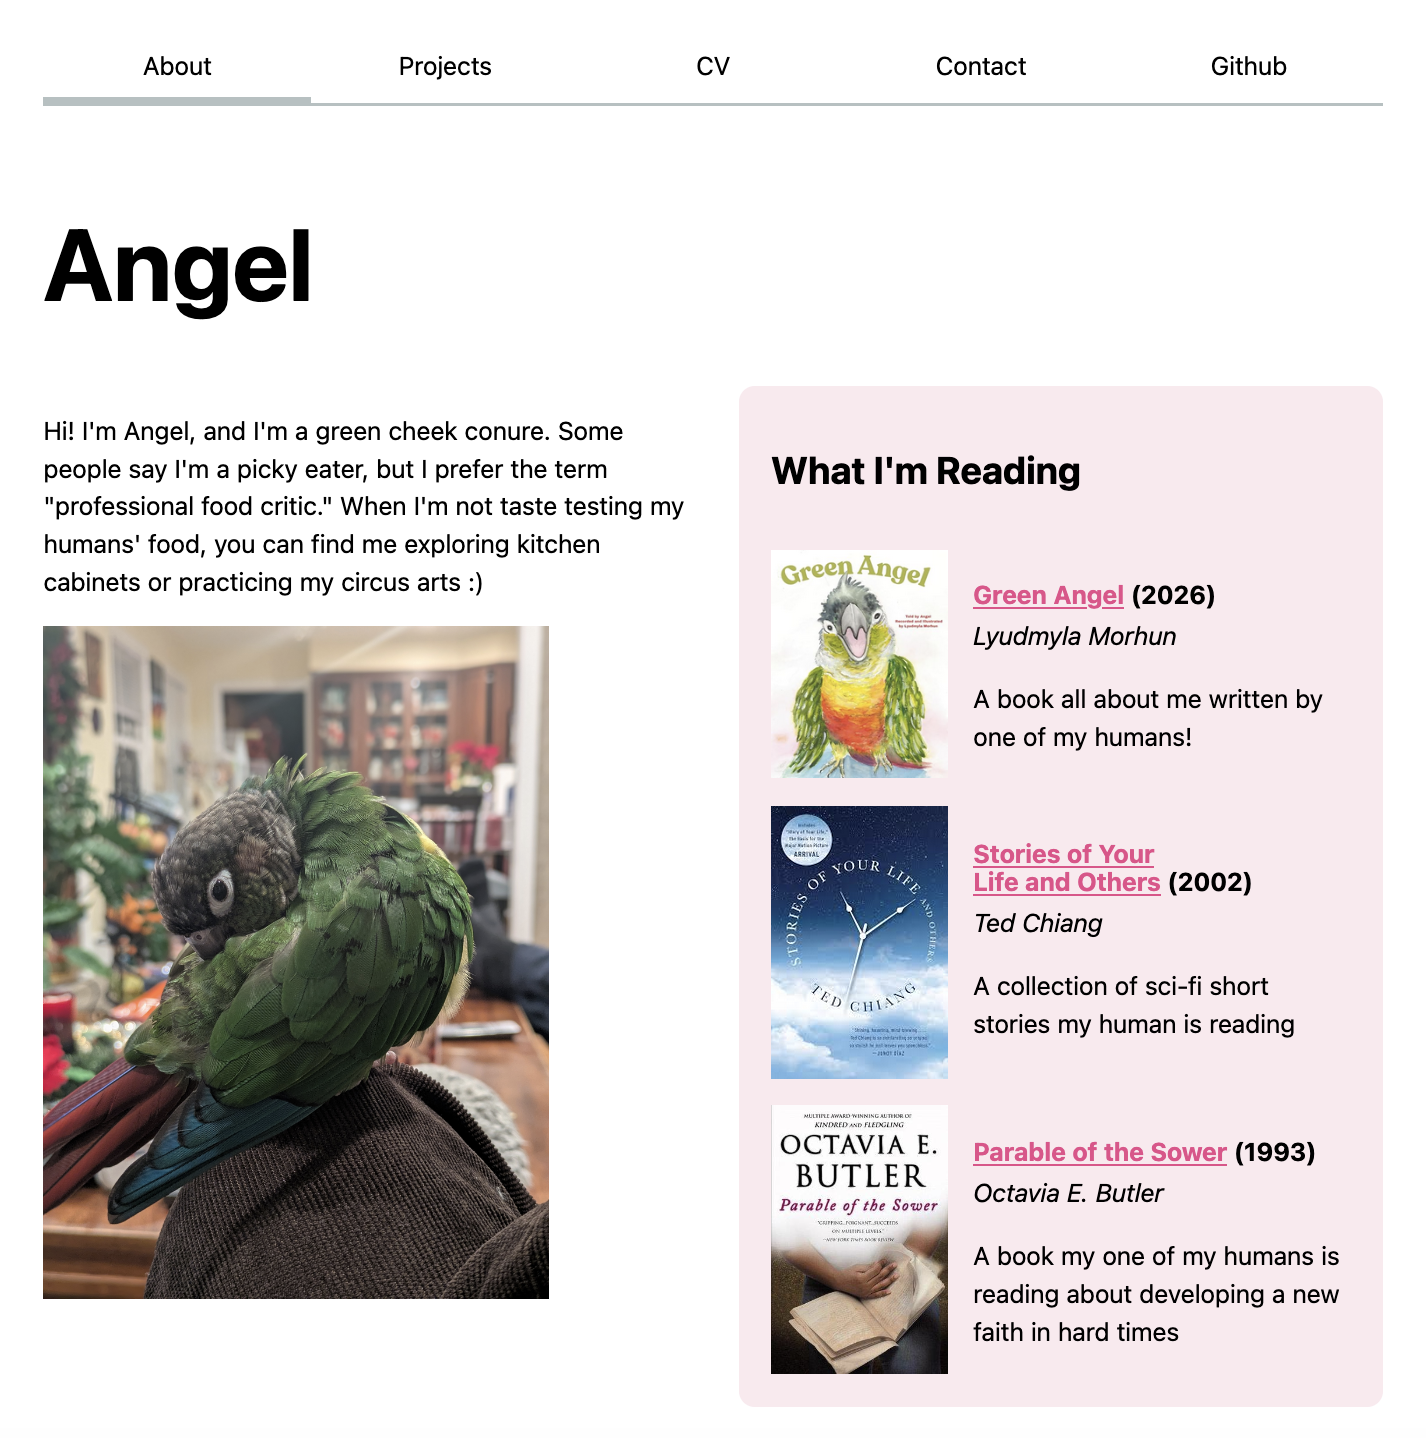
Here’s a simpler example without links, years, or descriptions: 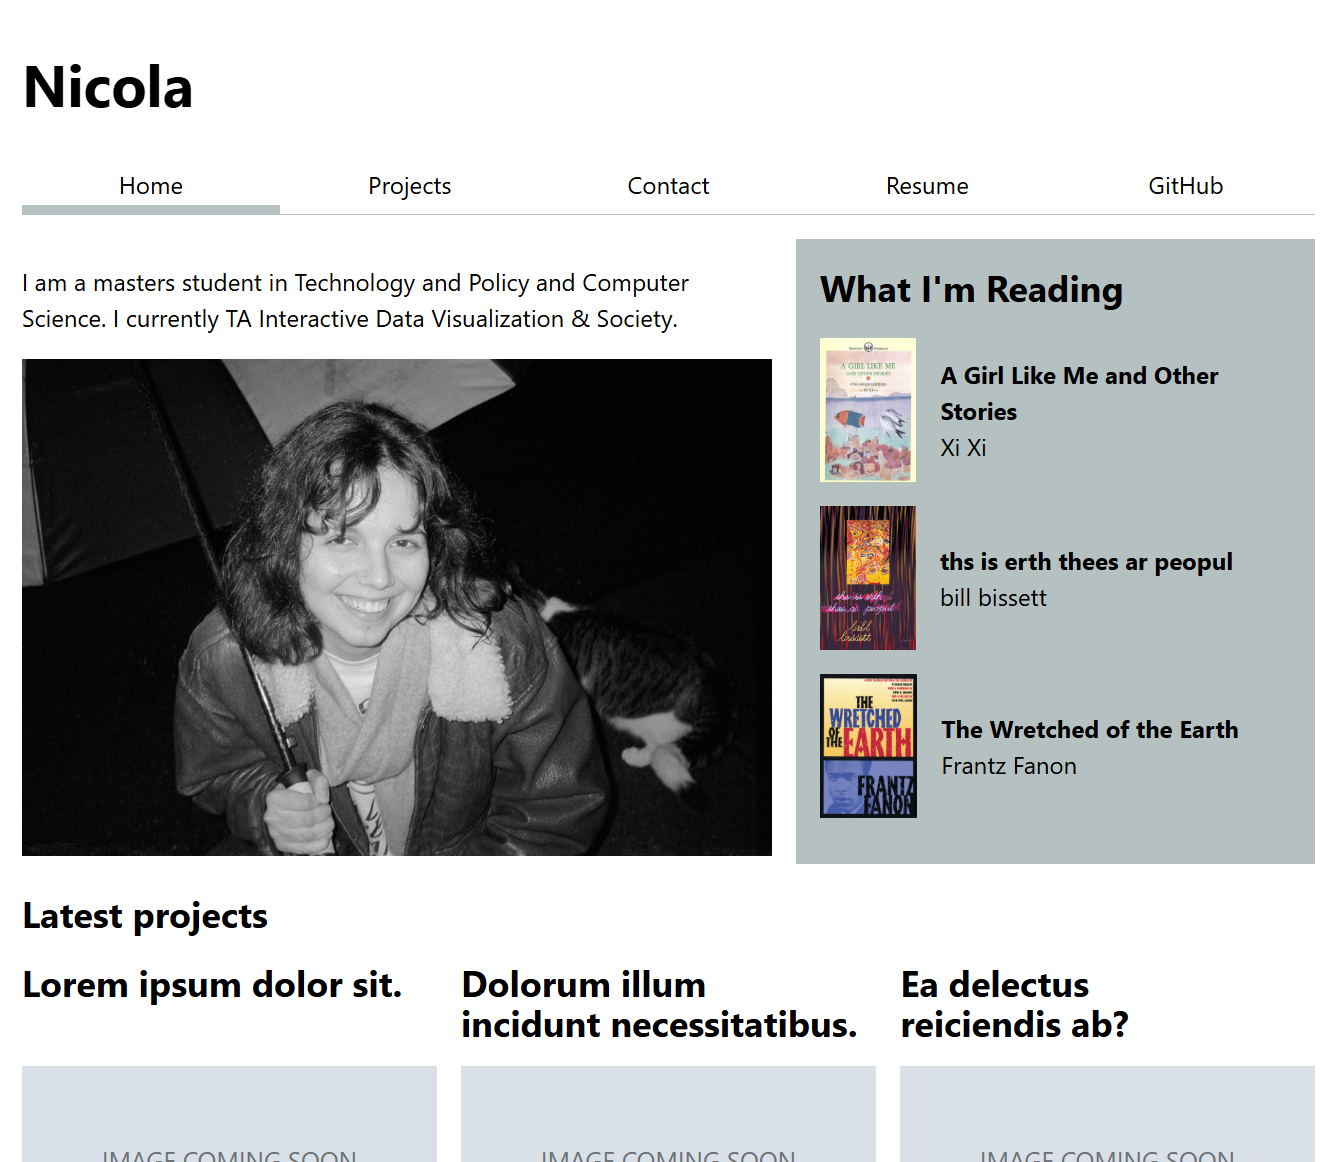
Appendix: Creating a Svelte Project from Scratch
The appendix shows how to create a new Svelte project repository for a website.
A.1: Creating a new blank Svelte/SvelteKit project
Decide on a name for your new repository (I called it my-portfolio below).
Open your website folder with VS Code. Open the integrated terminal, and type cd .. to go to its parent folder.
Now, run the following in the terminal:
npm create svelte@4 my-portfolio
The npm create command creates a new project using a template. Note that my-portfolio is the name of the new folder that will be created, so you may want to tweak it accordingly (just make sure to pick a different name than that of the folder containing your existing website!).
You may initially be prompted to install Svelte 4 if you haven’t installed it previously. You can just select y here to indicate you would like to install it.
Then, for the questions shown below, use the up and down arrows on your keyboard to navigate. You will want to select Skeleton project, No, and then press Enter without selecting anything for the last question. You can follow the video shown below for this step!
You should now have a new folder called my-portfolio.
A.2: Creating a new repository for our new project
Using GitHub Desktop, select File → Add Local Repository… create a new repository for this folder by selecting it from the Choose option.
GitHub Desktop will warn you that there is no repository in the folder and ask if you want to create one. You should say yes.
Then, press “Publish repository” and publish it to GitHub.
A.3: Installing dependencies
Then open your new project in VS Code (Repository → Open in Visual Studio Code).
Open the VS Code terminal and run:
npm install && npm install -D svelte@4 && npm install -D @sveltejs/adapter-static@2
This will install all the dependencies for your new Svelte project. If && is not valid on your machine, feel free to run each npm install command separately. Be patient, it can take a while!
What does this command do? Let’s break it down:
&&separates different terminal commands, so this is actually three separate commands, each of which will be run in sequence:
npm installreads dependencies frompackage.jsonand installs the packages listed there.npm install -D svelte@4will replace the Svelte version already installed with the Svelte 4 (which we need for modern CSS support and to adapt from the differences of the latest version of Svelte 5).npm install -D @sveltejs/adapter-static@2will install the static adapter for SvelteKit v1, which we will use to deploy our website to GitHub Pages and remains compatible with Svelte 4.
Once npm install finishes, run:
npm run dev -- --open
This will start a local server on port 5173 and open http://localhost:5173/ in your default browser.
Svelte and SvelteKit Resources
JS resources
- MDN: JavaScript Basics
- MDN: JavaScript First Steps
- MDN Tutorials on JS
- JS Garden for JS quirks and gotchas
- Learn JS Data, a series of Observable notebooks about the basics of manipulating data using JavaScript in the browser.
Videos
- JavaScript in 12 Minutes
- JS 1-Hour tutorial
- A series of interactive JavaScript Tutorials
- Udemy course
Books
- Eloquent Javascript by Marijn Haverbeke – free online book for programming beginners
- JavaScript: The Good Parts by Douglas Crockford (See also his YUI videos)
- Learning JavaScript Design Patterns by Addy Osmani